Zones

Burning Steppes

Morgan's Vigil and Flame Crest are the only resets. Everything north and east of the road is Blackrock orc, Firegut ogre, or black dragonflight ground.

Buff My Pet Editorial
Classic Hardcore · safety route

Quest safety dossier

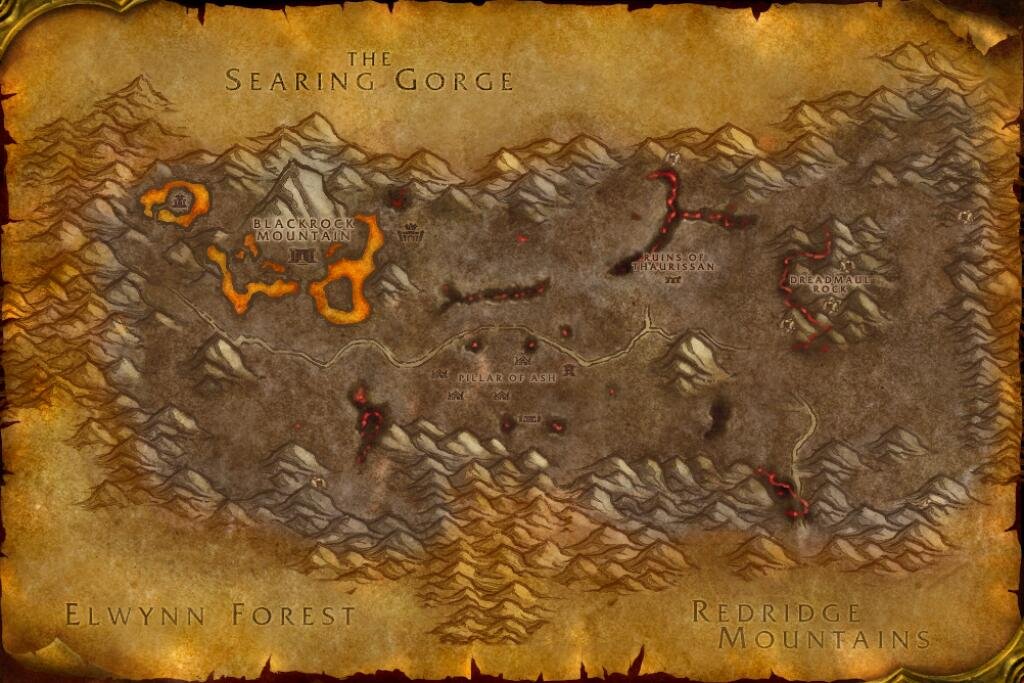
The annotated Classic map shows approximate quest-risk locations, broad hazard areas, and safe anchors. Callouts show our conservative verdict, safety level, and first risk. The lists carry the full failure state and exit call.

Swipe or scroll sideways to inspect the full map.

Map guidance

The Classic zone map is decorative. Numbered markers match the checkpoint cards below. Hazard highlights show approximate risk corridors or areas, never exact spawn points or patrol paths; the visible zone-wide hazard list following the figure carries the equivalent warning details.

Map anchors
  • Morgan's Vigil (safe hub)
  • Flame Crest (safe hub)
  • Blackrock Pass (road gate)
  • Blackrock Mountain (cave)
  • Altar of Storms (danger area)
  • Blackrock Stronghold (camp)
  • Lava Flats (danger area)
  • Pillar of Ash (camp)
  • Ragged John Cave (cave)
  • Ruins of Thaurissan (danger area)
  • Terror Wing Path (danger area)
  • Dreadmaul Caves (cave)
  • Dreadmaul Rock (danger area)

Annotated Classic zone map. Quest callouts give a short checkpoint label, verdict, safety level, and first listed risk; +N means the card lists more risks. Hazard highlights mark approximate risk corridors or areas, not exact spawn points or patrol paths. Connection relationships are not drawn as navigation lines. Morgan's Vigil and Flame Crest are the only two resets that matter. Everything north and east of the road is Blackrock orc, Firegut ogre or black dragonflight ground, and the pass road south is the cheapest way out. Keep Blackrock Mountain and the Dreadmaul caves on separate group-only branches. Confirm exact navigation in game. Numbered markers match the ordered checklist below.

  • Do now
  • Return later
  • Bring a group
  • Skip
Persistent threats

Zone-wide hazards

Map highlights are approximate risk areas or corridors. Use these static warnings for the complete call and confirm the threat in game.

  • Warning

    50-55 · Both

    Blackrock Pass road

    Map label: Pass road patrols

    Risk
    PatrolTravelAmbush
    Area
    The road from the Redridge gate up through Blackrock Pass and west along the southern flats toward the Pillar of Ash. It is the only low-commitment line across the zone, and for most of its length it runs inside pull range of the slopes on both sides.
    Failure state
    You ride the pass at 50 to reach a quest hub, a slope pull lands on the road, and the fight drags you off the path into the rocks where a second body is already walking.
    Exit call
    If something engages you on the road, keep running along the road. Do not take the fight uphill and do not cut a corner through the rocks to save time.
    Back to map
  • Warning

    52-58 · Both

    Blackrock camp belt

    Map label: Blackrock orc belt

    Risk
    Dense campRespawnRunnersPatrol
    Area
    The Blackrock orc ground running from the Pillar of Ash west through Blackrock Stronghold and up to the Altar of Storms. The camps sit close enough that a runner from one reaches the next, and the belt refills behind you while you are still fighting.
    Failure state
    You pull one orc off a camp edge, it runs at low health, and it comes back with the next camp attached while your first target is still standing.
    Exit call
    Kill runners before they clear the camp line or do not start the pull. If one gets away, leave the belt entirely and reset on the road.
    Back to map
  • Warning

    52-58 · Both

    Black dragonflight

    Map label: Drake flights

    Risk
    ElitePatrolAmbush
    Area
    The dragonkin shelves running from Terror Wing Path down past the Ruins of Thaurissan toward the Dreadmaul lava streams. Broodlings, dragonspawn and wyrmkin share the same open ground, so pulls link across terrain that offers no cover for breaking line of sight.
    Failure state
    You take a broodling in the open, a wyrmkin on the next shelf links into the fight, and there is no rock close enough to break line of sight before the second one lands on you.
    Exit call
    If a second dragonkin joins, run downhill toward the road instead of sideways along the shelf. The shelves are where the next link comes from.
    Back to map
  1. Checkpoint 1

    52+ · Alliance

    The True Masters: get to Morgan's Vigil alive

    Do now
    Risk
    TravelPatrol
    Map position
    Near Morgan's Vigil · marker 1 at approximately 88% from the left and 64% from the top
    Failure state
    The Lakeshire, Stormwind and Bolvar legs are free travel. The last leg is the one that kills: you ride Blackrock Pass to reach Marshal Maxwell, a patrol cuts the road above the Redridge gate, and the fight drags a second body down the slope before you clear the switchback.
    Exit call
    If anything engages you on the pass road, run south downhill toward Redridge rather than forward to the Vigil. Bank the Morgan's Vigil flight point before you accept anything else in this zone.
    Back to map
  2. Checkpoint 2

    54+ · Alliance

    Ragged John in the northern cave

    Return later
    Risk
    CaveTravelAmbush
    Map position
    Near Ragged John Cave · marker 2 at approximately 51% from the left and 29% from the top
    Failure state
    Maxwell sends you north for a conversation, so it reads as a free quest. The walk crosses open dragonkin and orc ground with no road cover, and one tag becomes two pulls with the cave mouth still fifty yards off.
    Exit call
    If a second body joins on the approach, break back downhill to the road and re-enter from a cleared angle. Make the walk once, at 54 or better, with every other northern errand batched into the same trip.
    Back to map
  3. Checkpoint 3

    54+ · Both

    Broodling Essence off the Flame Crest shelf

    Do now
    Risk
    RespawnRunnersTravel
    Map position
    Near Flame Crest · marker 3 at approximately 68% from the left and 30% from the top
    Failure state
    Broodlings are the softest dragonkin in the zone, which is exactly why people over-pull them. Three at a time off the shelf below Flame Crest, one flees toward the ridge, and the shelf it wakes reaches you before the eighth essence is banked.
    Exit call
    If a broodling runs, let it go and reset to Flame Crest. Felnok Steelspring is in Everlook, so treat that follow-up as a planned Winterspring trip rather than a same-session errand.
    Back to map
  4. Checkpoint 4

    56+ · Alliance

    Dragonkin Menace and the single Black Drake

    Bring a group
    Risk
    ElitePatrolRespawn
    Map position
    Near Terror Wing Path · marker 4 at approximately 73% from the left and 33% from the top
    Failure state
    The fifteen broodlings are ordinary work and the ten dragonspawn are survivable one at a time. The single Black Drake is the line: you take it solo at 54, the dragonspawn below it link on the pull, and you are locked in melee with two of them while the drake is still near full.
    Exit call
    Run the broodling and dragonspawn counts solo from the shelf edges, then stop. If the drake pulls with anything attached, drop the tag and go downhill to the road, and come back for that one credit with a partner.
    Back to map
  5. Checkpoint 5

    55+ · Alliance

    Dreadmaul Rock: the whole Firegut contract

    Bring a group
    Risk
    Dense campRespawnRunnersAmbush
    Map position
    Near Dreadmaul Rock · marker 5 at approximately 74% from the left and 44% from the top
    Failure state
    Twenty-nine Firegut kills, a brute lord out in the open west of the rock, and a pike you have to carry to the summit all draw on the same camp. The slope refills while you work it, so the trip that ends the run is the one where a respawned Ogre-Mage opens at range with a Brute already closing.
    Exit call
    Work one slope face per trip from the road side and leave when the count stalls. If a patrol walks into the Gor'tesh fight, drop the tag and break west into open ground. Plant the pike on a separate trip with the climb line already cleared.
    Back to map
  6. Checkpoint 6

    55+ · Horde

    Krom'Grul in the Dreadmaul caves

    Bring a group
    Quest
    Krom'Grul
    Risk
    CaveDense campAmbush
    Map position
    Near Dreadmaul Caves · marker 6 at approximately 84% from the left and 43% from the top
    Failure state
    The objective sends you through the caves and mines of Dreadmaul Rock, which means entering several of them before you find the right one. A tunnel turn puts two ogres between you and the entrance, and Krom'Grul adds from the back of the chamber with no room left to kite.
    Exit call
    Clear the mouth of one cave at a time and keep the exit in view. If the tunnel behind you fills, leave without the nose-ring. These caves have one way out and no room to reset a bad pull.
    Back to map
  7. Checkpoint 7

    54+ · Horde

    Fractured Elemental Shards on the lava flats

    Do now
    Risk
    RespawnTravelPatrol
    Map position
    Near Lava Flats · marker 7 at approximately 38% from the left and 49% from the top
    Failure state
    Ten shards off the golems and elementals working the lava channels is the safest sustained farm in the zone, and that is the trap. You drift north chasing the last drop, cross into the Blackrock camp belt, and take a patrol on ground with no line back to the road.
    Exit call
    Farm the channels south of Blackrock Mountain with the road behind you. If the road drops out of sight, stop and walk back before the next pull. Ten shards are not worth the Stronghold edge.
    Back to map
  8. Checkpoint 8

    58+ · Alliance

    FIFTY! YEP! and the Pillar of Ash grind

    Skip
    Quest
    FIFTY! YEP!
    Risk
    Dense campRespawnRunnersPatrol
    Map position
    Near Pillar of Ash · marker 8 at approximately 44% from the left and 58% from the top
    Failure state
    Fifty Blackrock Medallions is hours of repeat pulls inside camps that refill behind you. The kill that ends the character is a respawn at your back while the pull in front is still up and your cooldowns are already spent.
    Exit call
    Skip it on a hardcore character. If you take it anyway, cap each trip at one camp edge, and leave the zone the moment a respawn lands behind you rather than fighting through it.
    Back to map
  9. Checkpoint 9

    57+ · Both

    Tablet of the Seven is a Blackrock Depths run

    Skip
    Risk
    EliteCaveDense camp
    Map position
    Near Blackrock Mountain · marker 9 at approximately 25% from the left and 41% from the top
    Failure state
    The turn-in is a goblin standing safely in the open, so the quest reads as a delivery. The transcript itself is inside Blackrock Depths, and solo the run ends on a linked patrol in the entry corridors long before you reach the tablet.
    Exit call
    Take it only with a full group that has already cleared to the tablet. If the group breaks up inside the mountain, leave with them on that trip rather than holding position for a reform.
    Back to map
Before this route

Prepare the failure states

Read the lessons that match this map's terrain, group pressure, travel, and reset risks.

Levels 50-58

Burning Steppes gives a hardcore character two resets and one safe line. Morgan's Vigil and Flame Crest are the resets, the pass road south is the way out, and everything north and east of that road is held ground.

What kills characters here

  • The Blackrock camp belt: camps from the Pillar of Ash to the Altar of Storms sit close enough that runners link them.

  • Black dragonflight: broodlings, dragonspawn and whelps layer the northeastern shelves above the Ruins of Thaurissan.

  • Firegut ogres: the Dreadmaul caves are a group branch, not a solo detour.

Plan the trips

  • Bank at Morgan's Vigil or Flame Crest before every objective north of the road.

  • Use the pass road south as the exit. It is the cheapest line out of the zone.

  • Keep Blackrock Mountain and the Dreadmaul caves grouped. Neither is a solo objective at this level.

The reset is the plan

One runner in the camp belt pulls the next camp. Break line of sight toward the road before the second group arrives.

Related articles
Last updated