Zones

Felwood

Use the main road as the spine and enter Jaedenar, Shadow Hold, and the Jadefire ground on purpose. Corrupted ancients read as scenery until they move.

Buff My Pet Editorial
Classic Hardcore · safety route

Quest safety dossier

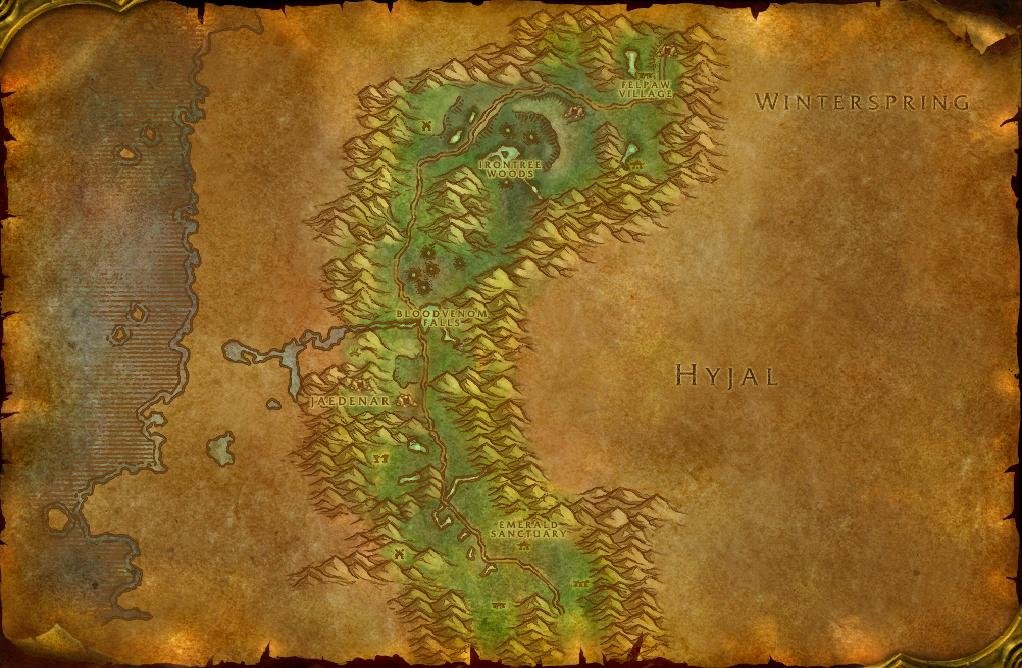
The annotated Classic map shows approximate quest-risk locations, broad hazard areas, and safe anchors. Callouts show our conservative verdict, safety level, and first risk. The lists carry the full failure state and exit call.

Swipe or scroll sideways to inspect the full map.

Map guidance

The Classic zone map is decorative. Numbered markers match the checkpoint cards below. Hazard highlights show approximate risk corridors or areas, never exact spawn points or patrol paths; the visible zone-wide hazard list following the figure carries the equivalent warning details.

Map anchors
  • Timbermaw Gate (road gate)
  • Talonbranch Glade (safe hub)
  • Irontree Woods (danger area)
  • Shatter Scar Vale (danger area)
  • Bloodvenom Post (safe hub)
  • Jaedenar (danger area)
  • Shadow Hold (cave)
  • Jadefire Run (camp)
  • Emerald Sanctuary (safe hub)
  • Jadefire Glen (danger area)
  • Ashenvale Road (road gate)

Annotated Classic zone map. Quest callouts give a short checkpoint label, verdict, safety level, and first listed risk; +N means the card lists more risks. Hazard highlights mark approximate risk corridors or areas, not exact spawn points or patrol paths. Connection relationships are not drawn as navigation lines. Treat the main road as the spine: Emerald Sanctuary in the south, Bloodvenom Post in the middle, Talonbranch Glade and the Timbermaw gate in the north. Jaedenar, Shadow Hold, and the Jadefire ground are branches you enter on purpose and leave on a trigger. Confirm exact navigation in game. Numbered markers match the ordered checklist below.

  • Do now
  • Return later
  • Bring a group
  • Skip
Persistent threats

Zone-wide hazards

Map highlights are approximate risk areas or corridors. Use these static warnings for the complete call and confirm the threat in game.

  • Warning

    50-55 · Both

    Deadwood north road

    Map label: Deadwood patrols

    Risk
    PatrolRunnersDense camp
    Area
    The main road between Talonbranch Glade and Felpaw Village, where Deadwood furbolg groups sit within calling distance of the pavement.
    Failure state
    You cross a Deadwood camp at low health, a Pathfinder opens at range, and the runner it sends brings two more furbolgs onto the road before you clear the bend.
    Exit call
    Ride the north road at full health and do not dismount for loot. If a Deadwood tags you, keep moving to Talonbranch Glade instead of turning to fight.
    Back to map
  • Warning

    50-56 · Both

    Felbound ancients

    Map label: Felbound ancients

    Risk
    AmbushPatrol
    Area
    The Irontree Woods bowl and the slopes running down to Bloodvenom Falls, where corrupted ancients stand still enough to read as scenery.
    Failure state
    You cut a corner through Irontree Woods to save a minute, an ancient you read as a tree turns on you, and a second one closes while the first is still swinging.
    Exit call
    Keep the road in sight when you cross Irontree. On a second ancient, break downhill to the road rather than deeper into the bowl.
    Back to map
  • Warning

    52-57 · Both

    Jadefire stealth

    Map label: Jadefire ambush

    Risk
    AmbushDense camp
    Area
    The satyr ground between Jadefire Run and Jadefire Glen, on both sides of the southern road below Emerald Sanctuary.
    Failure state
    A Jadefire Shadowstalker opens from stealth while you are already committed to a Felsworn, and the pair holds you on open satyr ground with the road out of reach.
    Exit call
    Cross the southern satyr ground on the road, not through the camps. On a stealth opener, retreat north toward Emerald Sanctuary.
    Back to map
  1. Checkpoint 1

    50+ · Both

    Timbermaw Ally

    Do now
    Risk
    Dense campRunnersRespawn
    Map position
    Near Talonbranch Glade · marker 1 at approximately 62% from the left and 12% from the top
    Failure state
    A wounded Deadwood Pathfinder runs into Felpaw Village, returns with a Warrior and a Gardener, and eighteen kills you were pacing turn into a three-furbolg fight on the village floor.
    Exit call
    Pull single furbolgs off the outer huts. On the first runner, break south to the road and let the village reset before the next pull.
    Back to map
  2. Checkpoint 2

    52+ · Both

    Timbermaw Hold run

    Return later
    Risk
    CaveDense campTravel
    Map position
    Near Timbermaw Gate · marker 2 at approximately 71% from the left and 5% from the top
    Failure state
    You step into the tunnel still hostile to the Timbermaw, guards link inside the first bend, and the only way out is the corridor you just ran.
    Exit call
    Speak to Nafien at the gate and read your standing before you enter. If the furbolgs are still hostile, farm Deadwood headdress feathers outside until Neutral.
    Back to map
  3. Checkpoint 3

    51+ · Both

    Verifying the Corruption

    Do now
    Risk
    AmbushRespawnPatrol
    Map position
    Near Shatter Scar Vale · marker 3 at approximately 46% from the left and 39% from the top
    Failure state
    An Entropic Horror drifts into the crater while the first Entropic Beast is still up, and Shatter Scar Vale gives you nothing to break line of sight on between the craters and the road.
    Exit call
    Take one crater at a time from the rim with the road behind you. On a second beast, walk west to the road and drop the pull.
    Back to map
  4. Checkpoint 4

    53+ · Horde

    A Husband's Last Battle

    Bring a group
    Risk
    PatrolAmbush
    Map position
    Near Irontree Woods · marker 4 at approximately 46% from the left and 32% from the top
    Failure state
    You find Overlord Ror mid-corridor between Irontree Woods and Shatter Scar Vale, and a corrupted beast joins the fight before the claw drops.
    Exit call
    Clear the ground around him before you tag. If anything joins, drop the claw and run west to the road instead of deeper into the woods.
    Back to map
  5. Checkpoint 5

    50+ · Both

    Forces of Jaedenar

    Do now
    Risk
    Dense campRunnersPatrol
    Map position
    Near Jaedenar · marker 5 at approximately 45% from the left and 57% from the top
    Failure state
    A Jaedenar Cultist at low health runs between the huts, and the Adept and Hound that answer arrive while the Guardsman in front of you is still swinging.
    Exit call
    Work the eastern huts from the road side and kill Adepts first. On the first runner, leave for the road and let that block reset.
    Back to map
  6. Checkpoint 6

    52+ · Both

    Collection of the Corrupt Water

    Bring a group
    Risk
    Dense campPatrolTravel
    Map position
    Near Jaedenar · marker 6 at approximately 40% from the left and 62% from the top
    Failure state
    The canteen fills in the centre of Jaedenar with cultist huts on three sides, and a patrol crossing back over the entry lane closes the only way out while you are still standing in the well.
    Exit call
    Clear the lane in and the lane back out before you fill. If a patrol crosses behind you, leave the canteen empty and take the cleared lane out.
    Back to map
  7. Checkpoint 7

    56+ · Both

    Shadow Hold

    Skip
    Risk
    CaveEscortDense campRespawn
    Map position
    Near Shadow Hold · marker 7 at approximately 35% from the left and 69% from the top
    Failure state
    Arko'narin walks the escort back through rooms you already cleared, the Shadow Hold respawn lands behind her, and the fight ends between the braziers with no lane to the entrance.
    Exit call
    Do not open this branch solo. Return with a full group, take one objective per prepared trip, and leave through the entrance the moment the escort path stops being clear.
    Back to map
  8. Checkpoint 8

    55+ · Alliance

    Ancient Spirit

    Bring a group
    Risk
    EscortAmbushTravel
    Map position
    Near Emerald Sanctuary · marker 8 at approximately 46% from the left and 74% from the top
    Failure state
    Arei walks his own line south out of Felwood, the corrupted beasts he wakes arrive two at a time, and the escort finishes in eastern Ashenvale far from any road you scouted.
    Exit call
    Start with the southern road cleared and a partner on the flank. If two attackers land at once, break off and let Arei die rather than chase him into the trees.
    Back to map
  9. Checkpoint 9

    54+ · Alliance

    The Corruption of the Jadefire

    Bring a group
    Risk
    Dense campAmbushRunners
    Map position
    Near Jadefire Run · marker 9 at approximately 41% from the left and 84% from the top
    Failure state
    The two kill counts plus Xavathras and Xavaric hold you inside the camps for a long stretch, and a Shadowstalker opens from behind while a Felsworn already has you.
    Exit call
    Take camp edges, never the middle, and stop the chain when the remaining count needs a deep pull. Leave east to the road on any second satyr.
    Back to map
  10. Checkpoint 10

    52+ · Horde

    Well of Corruption

    Return later
    Risk
    AmbushDense campTravel
    Map position
    Near Jadefire Glen · marker 10 at approximately 46% from the left and 85% from the top
    Failure state
    The kitten leg runs the satyr ground a second time from Bloodvenom Post, and the return pass meets a refilled Jadefire camp on the same open approach you used going in.
    Exit call
    Do the water sample and the kitten in one prepared trip at 52 or later. If the approach has refilled, turn back to Emerald Sanctuary and try the run again.
    Back to map
Before this route

Prepare the failure states

Read the lessons that match this map's terrain, group pressure, travel, and reset risks.

Levels 48-55

Felwood runs north to south on one road. Emerald Sanctuary, Bloodvenom Post, and Talonbranch Glade sit on it, and everything dangerous sits off it. Treat each branch as a trip you enter deliberately and leave on a trigger.

What kills characters here

  • Deadwood furbolg: groups sit within calling distance of the pavement on the northern road.

  • Felbound ancients: they stand still enough to read as scenery until the pull is already committed.

  • Jadefire satyrs: stealthed adds on both sides of the southern road below Emerald Sanctuary.

Plan the trips

  • Keep the road as the spine. Bank at the nearest post before stepping off it.

  • Enter Jaedenar and Shadow Hold as prepared trips, not as stops on a loop.

  • Check standing objects before pulling. An ancient that has not moved is still a mob.

The reset is the plan

Felwood kills characters that treat the ground beside the road as empty. It is not empty.

Related articles
Last updated