Zones

Duskwood

Quest from Darkshire outward, check the road for Stitches, and pull Worgen caves back toward the entrance.

Buff My Pet Editorial
Classic Hardcore · safety route

Quest safety dossier

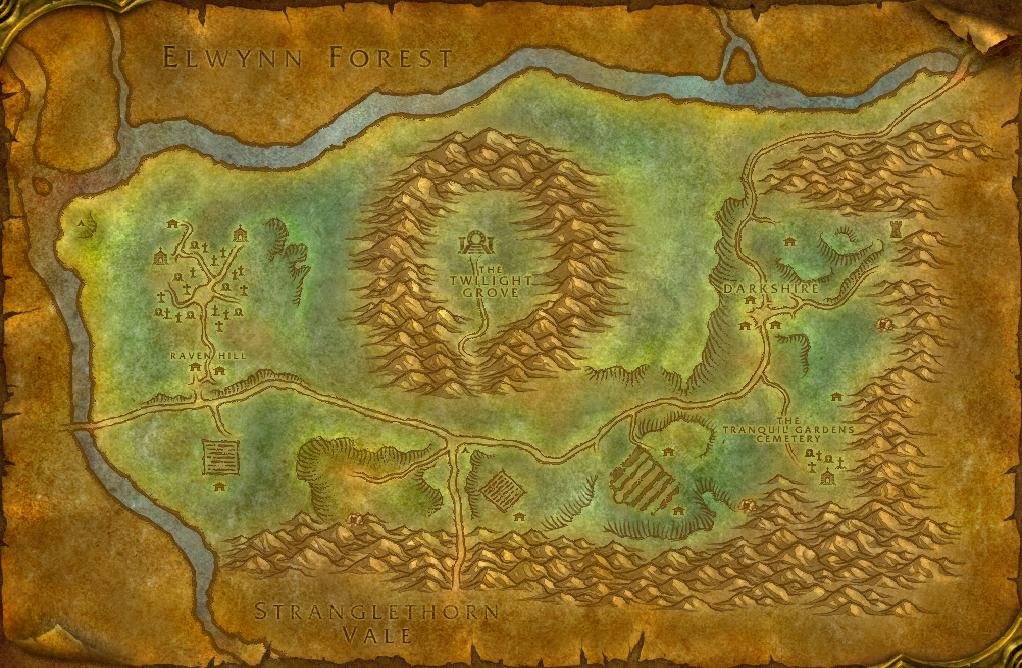
The annotated Classic map shows approximate quest-risk locations, broad hazard areas, and safe anchors. Callouts show our conservative verdict, safety level, and first risk. The lists carry the full failure state and exit call.

Swipe or scroll sideways to inspect the full map.

Map guidance

The Classic zone map is decorative. Numbered markers match the checkpoint cards below. Hazard highlights show approximate risk corridors or areas, never exact spawn points or patrol paths; the visible zone-wide hazard list following the figure carries the equivalent warning details.

Map anchors
  • Westfall Gate (road gate)
  • Raven Hill (camp)
  • Raven Hill Cemetery (danger area)
  • Abercrombie's Shack (camp)
  • Darkshire (safe hub)
  • Manor Mistmantle (danger area)
  • Tranquil Cemetery (danger area)
  • The Rotting Orchard (danger area)
  • Roland's Doom (cave)

Annotated Classic zone map. Quest callouts give a short checkpoint label, verdict, safety level, and first listed risk; +N means the card lists more risks. Hazard highlights mark approximate risk corridors or areas, not exact spawn points or patrol paths. Connection relationships are not drawn as navigation lines. Use the main road between Raven Hill and Darkshire only after checking for Stitches. Treat each cemetery, orchard, and cave as a separate out-and-back branch. Confirm exact navigation in game. Numbered markers match the ordered checklist below.

  • Do now
  • Return later
  • Bring a group
  • Skip
Persistent threats

Zone-wide hazards

Map highlights are approximate risk areas or corridors. Use these static warnings for the complete call and confirm the threat in game.

  • Warning

    35 elite · Both

    Stitches

    Map label: Stitches patrol

    Risk
    PatrolElite
    Area
    Road from Raven Hill to Darkshire
    Failure state
    Stitches enters the road while you are fighting or your retreat lane is occupied.
    Exit call
    Before aggro, leave the road into already-cleared ground and wait for him to pass.
    Back to map
  1. Checkpoint 1

    22+ · Alliance

    Eight-Legged Menaces

    Do now
    Risk
    Dense camp
    Map position
    Near Westfall Gate · marker 1 at approximately 13% from the left and 70% from the top
    Failure state
    A second spider commits to the pull.
    Exit call
    Stop and reset to the road.
    Back to map
  2. Checkpoint 2

    23+ · Alliance

    The Hermit to Supplies from Darkshire

    Do now
    Risk
    Travel
    Map position
    Near Abercrombie's Shack · marker 2 at approximately 28% from the left and 31% from the top
    Failure state
    The return path toward Darkshire is no longer clean.
    Exit call
    If Stitches is visible, wait at the shack or use a cleared alternate route; otherwise leave for Darkshire.
    Back to map
  3. Checkpoint 3

    24+ · Alliance

    The Night Watch I

    Do now
    Risk
    UndeadDense camp
    Map position
    Near Tranquil Cemetery · marker 3 at approximately 81% from the left and 74% from the top
    Failure state
    A second undead commits to the pull.
    Exit call
    Break toward Darkshire.
    Back to map
  4. Checkpoint 4

    22–25 · Alliance

    The Totem of Infliction

    Do now
    Risk
    Undead
    Map position
    Near Raven Hill Cemetery · marker 4 at approximately 28% from the left and 42% from the top
    Failure state
    The final missing drop requires an unsafe pull.
    Exit call
    Leave it unfinished and continue on a safer card.
    Back to map
  5. Checkpoint 5

    26+ · Alliance

    The Night Watch II

    Return later
    Risk
    ElitePatrolUndead
    Map position
    Near Raven Hill Cemetery · marker 5 at approximately 22% from the left and 47% from the top
    Failure state
    Mor'Ladim enters the pull lane or the retreat path closes.
    Exit call
    Turn back before the retreat path closes.
    Back to map
  6. Checkpoint 6

    28–30 · Alliance

    Worgen in the Woods I–II

    Return later
    Risk
    Dense camp
    Map position
    Near The Rotting Orchard · marker 6 at approximately 67% from the left and 78% from the top
    Failure state
    A second worgen commits to the pull.
    Exit call
    Reset toward Darkshire.
    Back to map
  7. Checkpoint 7

    31+ · Alliance

    Worgen in the Woods III

    Bring a group
    Risk
    CaveDense campRespawn
    Map position
    Near Roland's Doom · marker 7 at approximately 73% from the left and 76% from the top
    Failure state
    Gutspill, another add, or a fast respawn blocks the cave mouth.
    Exit call
    Leave through the mouth while it is still clean.
    Back to map
  8. Checkpoint 8

    30+ · Alliance

    The Night Watch III

    Return later
    Risk
    UndeadDense camp
    Map position
    Near Raven Hill Cemetery · marker 8 at approximately 23% from the left and 36% from the top
    Failure state
    The outside pull lane at the eastern catacomb loses its clean retreat.
    Exit call
    Stay outside; wait for respawns rather than pushing into the catacomb.
    Back to map
  9. Checkpoint 9

    35+ · Alliance

    The Weathered Grave to Mor'Ladim

    Bring a group
    Risk
    ElitePatrolUndead
    Map position
    Near Raven Hill Cemetery · marker 9 at approximately 17% from the left and 37% from the top
    Failure state
    An uncontrolled add joins Mor'Ladim in the cemetery.
    Exit call
    Leave the cemetery on the first uncontrolled add.
    Back to map
  10. Checkpoint 10

    35+ · Alliance

    The Legend of Stalvan finale

    Return later
    Risk
    Dense campRunnersUndead
    Map position
    Near Manor Mistmantle · marker 10 at approximately 77% from the left and 36% from the top
    Failure state
    Stalvan flees into nearby undead and brings an add into the fight.
    Exit call
    Reset toward the road instead of chasing him into another pull.
    Back to map
Before this route

Prepare the failure states

Read the lessons that match this map's terrain, group pressure, travel, and reset risks.

Levels 20-30

Start closer to 22. The opening mobs and elite patrols leave more room for a clean pull.

Named threats on the road

  • Stitches: an elite abomination on the main road. Check the road before traveling between quest areas.

  • Mor'Ladim: elite undead in the cemetery. Check nameplates before pulling nearby targets.

  • Worgen caves: tight packs and fast respawns. Pull to the entrance and keep a clear exit.

  • Worgen in the Woods III: sends players into Roland's Doom, where tight packs and fast respawns can close the exit. Bring a reliable group.

Let Darkshire be the anchor

  • Quest from Darkshire outward. Check the road for Stitches before riding at night.

  • Do the graveyard quests before the mine. The cemetery has a clearer retreat path.

  • Skip elite quests without a reliable group. Return when the group can control the route.

Use the road carefully

The road connects the quest areas, and Stitches patrols it. Check the route before riding through.
Related articles
Last updated