Zones

Redridge Mountains

Use Lakeshire as the reset point, finish the lake and outer camps as separate trips, and leave the northern cave and Stonewatch layer for a prepared group.

Buff My Pet Editorial
Classic Hardcore · safety route

Quest safety dossier

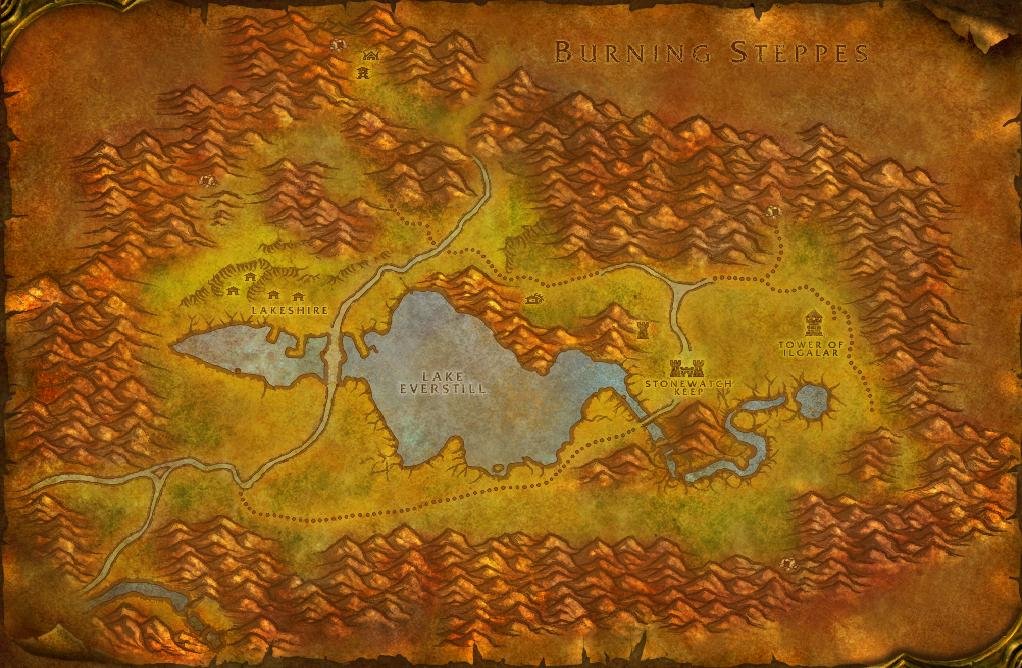
The annotated Classic map shows approximate quest-risk locations, broad hazard areas, and safe anchors. Callouts show our conservative verdict, safety level, and first risk. The lists carry the full failure state and exit call.

Swipe or scroll sideways to inspect the full map.

Map guidance

The Classic zone map is decorative. Numbered markers match the checkpoint cards below. Hazard highlights show approximate risk corridors or areas, never exact spawn points or patrol paths; the visible zone-wide hazard list following the figure carries the equivalent warning details.

Map anchors
  • Lakeshire (safe hub)
  • Three Corners (road gate)
  • Redridge Canyons (danger area)
  • Alther's Mill (camp)
  • Stonewatch Keep (danger area)
  • Galardell Valley (danger area)
  • Render's Valley (danger area)

Annotated Classic zone map. Quest callouts give a short checkpoint label, verdict, safety level, and first listed risk; +N means the card lists more risks. Hazard highlights mark approximate risk corridors or areas, not exact spawn points or patrol paths. Connection relationships are not drawn as navigation lines. Use Lakeshire as the reset point. Treat the lake, western canyons, northern cave, eastern gnoll valley, southeastern Blackrock camps, and Stonewatch as separate commitments. The Lake Thresher and Blackrock Outrunner samples show broad risk areas, never exact patrols or safe paths. Confirm exact navigation in game. Numbered markers match the ordered checklist below.

  • Do now
  • Return later
  • Bring a group
  • Skip
Persistent threats

Zone-wide hazards

Map highlights are approximate risk areas or corridors. Use these static warnings for the complete call and confirm the threat in game.

  • Warning

    25 elite · Alliance

    Lake Thresher

    Map label: Elite lake patrol

    Risk
    ElitePatrolTravel
    Area
    Central Lake Everstill around the submerged toolbox approach
    Failure state
    The elite reaches the toolbox approach while the character is in the water and the nearest shore is no longer clear.
    Exit call
    Watch the lake before entering. If the Thresher owns the chest or cuts across the return, leave the water and reset the attempt.
    Back to map
  • Warning

    20–21 · Alliance

    Blackrock Outrunners

    Map label: Outrunner Net + Enrage

    Risk
    Dense campTravel
    Area
    Outer Blackrock camps in southeastern Redridge and the approach toward Stonewatch
    Failure state
    A ten-second Net holds the retreat while another Blackrock closes, then Enrage makes the late disengage more expensive.
    Exit call
    Pull only beside already-cleared ground. After a Net or uncontrolled extra, stabilize and leave instead of entering the next camp.
    Back to map
  1. Checkpoint 1

    19–20 · Alliance

    The Lost Tools

    Do now
    Risk
    EliteTravel
    Map position
    Near Lakeshire · marker 1 at approximately 42% from the left and 55% from the top
    Failure state
    The toolbox interaction commits you underwater while the level-25 elite Lake Thresher crosses the return to shore.
    Exit call
    Watch the full chest approach first. If the Thresher owns the water or the shore is occupied, leave and retry later.
    Back to map
  2. Checkpoint 2

    19–20 · Alliance

    Underbelly Scales

    Do now
    Risk
    Dense campTravel
    Map position
    Near Three Corners · marker 2 at approximately 42% from the left and 74% from the top
    Failure state
    Two ranged whelps create overlapping Fireballs while the drop hunt pulls the fight away from cleared ground.
    Exit call
    Work isolated roadside spawns. On a second whelp or ranged crossfire, break back through the cleared strip.
    Back to map
  3. Checkpoint 3

    20+ · Alliance

    A Baying of Gnolls and The Everstill Bridge

    Do now
    Risk
    Dense campTravel
    Map position
    Near Redridge Canyons · marker 3 at approximately 28% from the left and 32% from the top
    Failure state
    A Mystic heal and nearby Basher knockdown overlap after the long kill quota encourages one more camp pull.
    Exit call
    Work from the camp edge, interrupt Mystics, and reset to the road instead of chasing a runner inward.
    Back to map
  4. Checkpoint 4

    21+ · Alliance

    Blackrock Menace

    Do now
    Risk
    Dense campTravel
    Map position
    Near Render's Valley · marker 4 at approximately 80% from the left and 72% from the top
    Failure state
    Axe sources lead from outer normal targets toward stronger Blackrock packs while a Net removes the planned retreat.
    Exit call
    Stay on a selected outer camp and leave after a Net or when the next objective would pull you toward Stonewatch.
    Back to map
  5. Checkpoint 5

    22+ · Alliance

    Rethban Ore

    Return later
    Quest
    Rethban Ore
    Risk
    CaveRespawn
    Map position
    Near Redridge Canyons · marker 5 at approximately 19% from the left and 25% from the top
    Failure state
    The final ore keeps the route inside Rethban Caverns until a refill closes the same mouth needed for the exit.
    Exit call
    Use already-owned or traded ore when available. If self-farming, leave at the first back-respawn instead of forcing five.
    Back to map
  6. Checkpoint 6

    24+ · Alliance

    An Unwelcome Guest

    Return later
    Risk
    Dense campTravel
    Map position
    Near Three Corners · marker 6 at approximately 16% from the left and 49% from the top
    Failure state
    The level-24 named boar is started while nearby boars or the Lakeshire-side return are still occupied.
    Exit call
    Return at level 24 or with a partner, clear the area first, and abandon the tag when another beast joins.
    Back to map
  7. Checkpoint 7

    25–26 · Alliance

    Howling in the Hills

    Return later
    Risk
    Dense campTravel
    Map position
    Near Redridge Canyons · marker 7 at approximately 28% from the left and 21% from the top
    Failure state
    Yowler is tagged inside the northern gnoll pocket and nearby Mystics turn one named target into a camp pull.
    Exit call
    Return as a fresh trip, clear a lane, and pull Yowler into it. Reset rather than fighting through a linked pack.
    Back to map
  8. Checkpoint 8

    26–27 · Alliance

    Wanted: Lieutenant Fangore

    Bring a group
    Risk
    Dense campTravel
    Map position
    Near Galardell Valley · marker 8 at approximately 80% from the left and 37% from the top
    Failure state
    Quest availability hides a level-26 target inside a high-level Shadowhide area with linked guards and patrol pressure.
    Exit call
    Clear outward with a group and do not tag until the linked pack is controlled. Leave before the pull if it is not.
    Back to map
  9. Checkpoint 9

    27+ · Alliance

    Blackrock Bounty and Missing In Action

    Bring a group
    Risk
    CaveEscortRespawn
    Map position
    Near Redridge Canyons · marker 9 at approximately 30% from the left and 12% from the top
    Failure state
    The long Champion quota or Keeshan's movement gives a northern cave refill control of the group's pace and return.
    Exit call
    Pre-clear the cave and exterior with a group. If Keeshan enters an uncontrolled refill, retreat immediately along the cleared exit before his attackers transfer to you.
    Back to map
  10. Checkpoint 10

    26+ · Alliance

    Stonewatch Command

    Skip
    Risk
    EliteDense campRespawn
    Map position
    Near Stonewatch Keep · marker 10 at approximately 70% from the left and 56% from the top
    Failure state
    Elite Shadowcasters and two boss objectives turn the Keep into consecutive commitments while the outer compound refills.
    Exit call
    Skip solo. Reopen only for a coordinated full-group clear, one objective per prepared trip, with a clear compound exit.
    Back to map
Before this route

Prepare the failure states

Read the lessons that match this map's terrain, group pressure, travel, and reset risks.

Levels 15-25

Redridge opens at level 15, but the safer questing layer begins closer to 19-20. Keep Lakeshire as the reset point, separate the lake and outer camps, and treat every northern or eastern objective as a new trip.

Take the routed 19-20 layer

The Lost Tools, Underbelly Scales, and A Baying of Gnolls all appear in published Hardcore or Classic leveling routes around 19-20. Use that as evidence for the layer. Still check the elite lake patrol, isolate ranged whelps, and reset to the road between gnoll pockets.

Return for named targets

An Unwelcome Guest targets a normal level-24 Bellygrub. Howling in the Hills targets level-25 Yowler, and Wanted: Lieutenant Fangore ends inside a higher-level Shadowhide pocket. Published routes delay these targets. Return as separate trips rather than treating quest availability as a safety signal.

Let caves and elites set the pace

Rethban Ore can be completed with tradeable ore instead of a forced cave clear. Missing In Action gives Keeshan control of the pace once the escort starts. The Stonewatch quests add elite targets and respawn pressure. Decline those commitments when the group, entrance, or exit is not ready.

Where next

Move into Duskwood when the mid-20s layer fits your level. Rotate back to Westfall or Loch Modan instead when Redridge's remaining cards depend on a group.
Related articles
Last updated