Zones

Mulgore

Finish Red Cloud Mesa before Bloodhoof, keep the Palemane and Venture Co. caves optional, and bring help for Fizsprocket and Arra'chea.

Buff My Pet Editorial
Classic Hardcore · safety route

Quest safety dossier

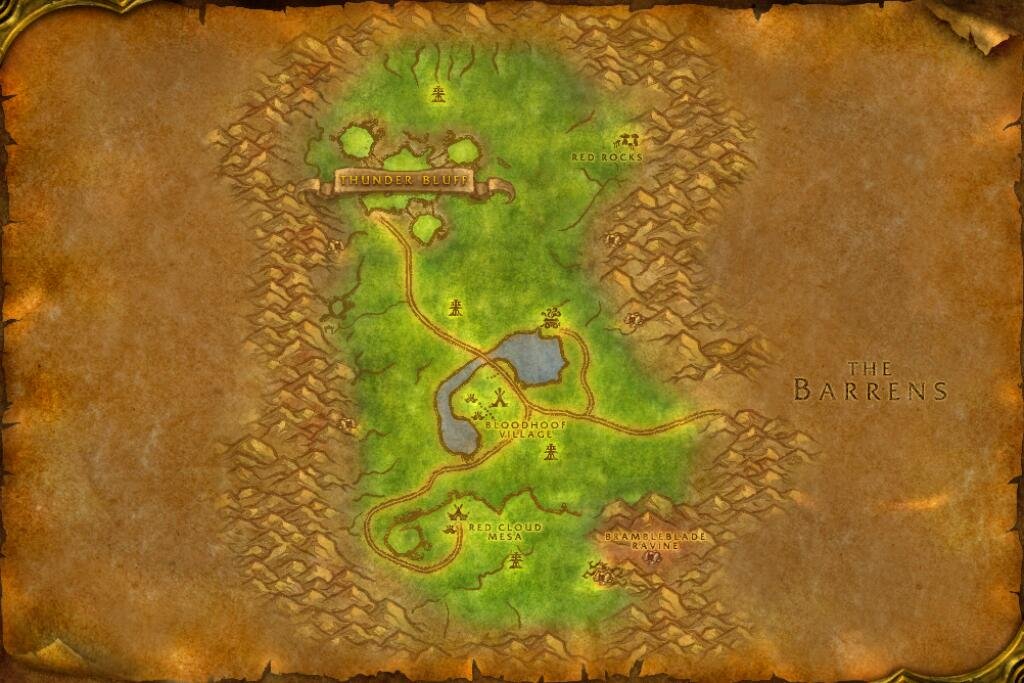
The annotated Classic map shows approximate quest-risk locations and safe anchors. Callouts show our conservative verdict, safety level, and first risk. The checklist carries the full failure state and exit call.

Swipe or scroll sideways to inspect the full map.

Map guidance

The Classic zone map is decorative. Numbered markers match the cards below; every card names its explicitly reviewed map anchor and approximate relative position.

Map anchors
  • Camp Narache (safe hub)
  • Brambleblade Ravine (danger area)
  • Bloodhoof Village (safe hub)
  • Palemane Rock (cave)
  • Dwarven Dig (danger area)
  • Windfury Ridge (danger area)
  • Ravaged Caravan (camp)
  • Venture Co. Mine (cave)
  • Thunder Bluff (safe hub)
  • Arra'chea Grounds (danger area)
  • Barrens Gate (road gate)

Annotated Classic zone map. Quest callouts give a short checkpoint label, verdict, safety level, and first listed risk; +N means the card lists more risks. Marker positions identify approximate quest-risk areas, not exact spawn points. Connection relationships are not drawn as navigation lines. Finish Red Cloud Mesa before Bloodhoof Village. Treat Brambleblade Ravine, the Palemane camps, the dwarven dig, Windfury ridge, the ravaged caravan, the Venture Co. mine, and Arra'chea as separate trips. Checkpoint markers are approximate risk areas, not exact spawns or safe paths. Confirm exact navigation in game. Numbered markers match the ordered checklist below.

  • Do now
  • Return later
  • Bring a group
  • Skip
  1. Checkpoint 1

    5+ · Horde

    Rite of Strength

    Do now
    Risk
    Dense campRunners
    Map position
    Near Brambleblade Ravine · marker 1 at approximately 70% from the left and 82% from the top
    Failure state
    A wounded Bristleback runs into another ravine pocket while the return to Camp Narache narrows.
    Exit call
    Work the outer ravine pockets and reset west instead of following a runner around the next bend.
    Back to map
  2. Checkpoint 2

    8+ · Horde

    Sharing the Land

    Return later
    Risk
    CaveRespawn
    Map position
    Near Palemane Rock · marker 2 at approximately 29% from the left and 74% from the top
    Failure state
    The surface kills are done but the poachers still pull you deeper while the cave entrance refills.
    Exit call
    Finish the open camps first. Enter for poachers only with an empty return lane, and leave on the first back-respawn.
    Back to map
  3. Checkpoint 3

    9+ · Horde

    Dwarven Digging

    Do now
    Risk
    Dense campRunners
    Map position
    Near Dwarven Dig · marker 3 at approximately 26% from the left and 48% from the top
    Failure state
    A wounded prospector runs toward another tent while the forge or tool step keeps you inside the camp.
    Exit call
    Clear and break picks from the outer camp edge; reset toward Bloodhoof before crossing a second tent line.
    Back to map
  4. Checkpoint 4

    9+ · Horde

    Dangers of the Windfury

    Return later
    Risk
    Dense campRespawn
    Map position
    Near Windfury Ridge · marker 4 at approximately 60% from the left and 61% from the top
    Failure state
    A Wind Witch starts another cast while a harpy or ridge respawn occupies the downhill retreat.
    Exit call
    Pull from the lower ridge outward and leave when the return to open grass stops being a single-mob lane.
    Back to map
  5. Checkpoint 5

    9+ · Horde

    The Ravaged Caravan

    Do now
    Risk
    Dense campTravel
    Map position
    Near Ravaged Caravan · marker 5 at approximately 45% from the left and 40% from the top
    Failure state
    A salvager reaches the crate while the interact delay exposes you to another caravan-side pull.
    Exit call
    Clear the crate side, inspect it once, and return to Morin instead of carrying the trip into the mine.
    Back to map
  6. Checkpoint 6

    10+ · Horde

    The Venture Co.

    Return later
    Risk
    Dense campRunners
    Map position
    Near Venture Co. Mine · marker 6 at approximately 66% from the left and 51% from the top
    Failure state
    A worker runs into the mine while another supervisor closes the exterior path back to the caravan.
    Exit call
    Take the required workers and supervisors outside. Do not follow a runner through the cave mouth.
    Back to map
  7. Checkpoint 7

    12+ · Horde

    Supervisor Fizsprocket

    Bring a group
    Risk
    CaveRespawn
    Map position
    Near Venture Co. Mine · marker 7 at approximately 68% from the left and 38% from the top
    Failure state
    The named pull or nearby worker survives while the long mine route respawns behind the group.
    Exit call
    Bring a group and preserve the entrance lane. Turn out immediately when a cleared bend refills.
    Back to map
  8. Checkpoint 8

    14+ · Horde

    Rites of the Earthmother: Arra'chea

    Bring a group
    Risk
    PatrolTravel
    Map position
    Near Arra'chea Grounds · marker 8 at approximately 58% from the left and 22% from the top
    Failure state
    Arra'chea holds the fight while another kodo or the long northern return removes the clean reset.
    Exit call
    Treat the hunt as a later group trip; disengage toward open ground before another kodo joins.
    Back to map
Before this route

Prepare the failure states

Read the lessons that match this map's terrain, group pressure, travel, and reset risks.

Levels 1-10

Finish Red Cloud Mesa before following the road to Bloodhoof Village. Mulgore's open grass gives generous reset space; the Palemane cave, ridge camps, and Venture Co. mine take that space away.

Use the open ground

Sharing the Land has useful surface kills before its cave poachers. Dwarven Digging can stay on the edge of the dig site. Do not turn either quest into a deeper push because the progress bar is almost full.

Stop at the mine mouth

The Venture Co. can progress on exterior workers and supervisors. Supervisor Fizsprocket is the separate cave decision. Bring a group later instead of letting the named reward pull a solo character past a refilling exit.

Where next

Continue to the Barrens after level 10. Train and repair in Thunder Bluff, then use the eastern road rather than carrying an unfinished cave trip into the transition.
Related articles
Last updated