Zones

The Barrens

Anchor at the Crossroads, split long chains into short loops, and leave Northwatch escorts for a prepared group.

Buff My Pet Editorial
Classic Hardcore · safety route

Quest safety dossier

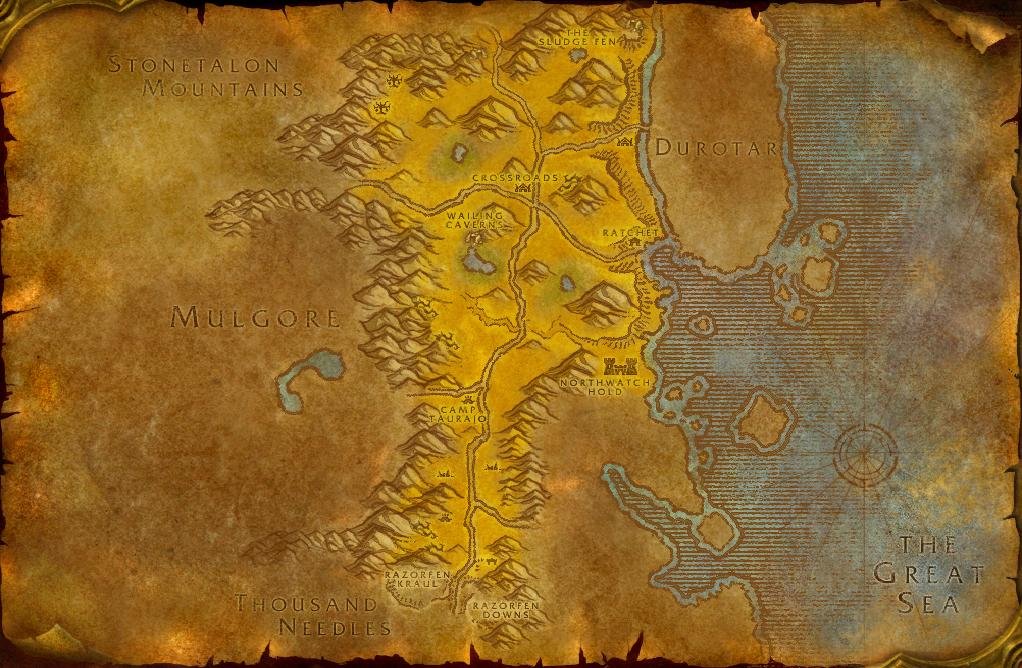
The annotated Classic map shows approximate quest-risk locations, broad hazard areas, and safe anchors. Callouts show our conservative verdict, safety level, and first risk. The lists carry the full failure state and exit call.

Swipe or scroll sideways to inspect the full map.

Map guidance

The Classic zone map is decorative. Numbered markers match the checkpoint cards below. Hazard highlights show approximate risk corridors or areas, never exact spawn points or patrol paths; the visible zone-wide hazard list following the figure carries the equivalent warning details.

Map anchors
  • Durotar Gate (road gate)
  • Dry Hills (danger area)
  • Kodo Bone Camp (camp)
  • The Crossroads (safe hub)
  • Razormane Camp (danger area)
  • Oasis Fields (danger area)
  • Ratchet (safe hub)
  • Southsea Coast (coast)
  • Camp Taurajo (safe hub)
  • Northwatch Hold (danger area)
  • The Great Lift (road gate)

Annotated Classic zone map. Quest callouts give a short checkpoint label, verdict, safety level, and first listed risk; +N means the card lists more risks. Hazard highlights mark approximate risk corridors or areas, not exact spawn points or patrol paths. Connection relationships are not drawn as navigation lines. Use the Crossroads and Ratchet as reset points. Treat every camp, oasis, and coastal objective as an out-and-back branch from the road. Confirm exact navigation in game. Numbered markers match the ordered checklist below.

  • Do now
  • Return later
  • Bring a group
  • Skip
Persistent threats

Zone-wide hazards

Map highlights are approximate risk areas or corridors. Use these static warnings for the complete call and confirm the threat in game.

  • Warning

    Mid-20s elites · Horde

    Alliance Outrunners

    Map label: Alliance Outrunners

    Risk
    PatrolElite
    Area
    Between Lushwater Oasis and Bael Modan, usually near the Southern Gold Road
    Failure state
    The elite patrol crosses the road while you are fighting near the oasis or Bael Modan approach.
    Exit call
    Move off the patrol line before combat starts and wait in already-cleared ground until the patrol passes.
    Back to map
  1. Checkpoint 1

    12–15 · Horde

    Razormane pressure

    Return later
    Risk
    Dense camp
    Map position
    Near Razormane Camp · marker 1 at approximately 59% from the left and 25% from the top
    Failure state
    An uncontrolled extra joins during the named follow-up.
    Exit call
    Pull outward and break for the Durotar road.
    Back to map
  2. Checkpoint 2

    16 · Horde

    Echeyakee

    Do now
    Quest
    Echeyakee
    Risk
    Event
    Map position
    Near Kodo Bone Camp · marker 2 at approximately 55% from the left and 17% from the top
    Failure state
    The summon pocket is not clear when Echeyakee appears.
    Exit call
    Kill, loot, and leave toward the Crossroads.
    Back to map
  3. Checkpoint 3

    17 · Horde

    The Angry Scytheclaws

    Do now
    Risk
    PatrolDense camp
    Map position
    Near Oasis Fields · marker 3 at approximately 52% from the left and 48% from the top
    Failure state
    A roaming Kolkar pack reaches the nest mound while you place a feather.
    Exit call
    Leave the nest mound for the Gold Road.
    Back to map
  4. Checkpoint 4

    15–20 · Horde

    Witchwing chain

    Return later
    Risk
    Dense campAmbushPatrol
    Map position
    Near Dry Hills · marker 4 at approximately 39% from the left and 12% from the top
    Failure state
    A stealthed Witchwing Ambusher or Sister Rathtalon enters the pull.
    Exit call
    Stop and reset to the outside camp edge.
    Back to map
  5. Checkpoint 5

    18 · Horde

    Verog the Dervish

    Return later
    Risk
    EventDense camp
    Map position
    Near Oasis Fields · marker 5 at approximately 51% from the left and 40% from the top
    Failure state
    Verog arrives before the command-tent pocket and return lane are clear.
    Exit call
    Reset from the cleared edge pocket to the road.
    Back to map
  6. Checkpoint 6

    19 · Horde

    Hezrul Bloodmark

    Bring a group
    Risk
    PatrolDense camp
    Map position
    Near Oasis Fields · marker 6 at approximately 46% from the left and 38% from the top
    Failure state
    Hezrul's moving pack has no clean retreat to the road.
    Exit call
    Do not open. Fall back to the road.
    Back to map
  7. Checkpoint 7

    19 · Horde

    Ishamuhale

    Do now
    Quest
    Ishamuhale
    Risk
    Event
    Map position
    Near Ratchet · marker 7 at approximately 58% from the left and 32% from the top
    Failure state
    The summon point is not clear when Ishamuhale appears.
    Exit call
    Kill and leave directly for Ratchet.
    Back to map
  8. Checkpoint 8

    14–16 · Both

    Southsea coast quests

    Do now
    Risk
    Dense camp
    Map position
    Near Southsea Coast · marker 8 at approximately 65% from the left and 46% from the top
    Failure state
    The route pushes beyond the cleared camp edge into the full pirate coast.
    Exit call
    Retreat north toward Ratchet before the cleared edge closes.
    Back to map
  9. Checkpoint 9

    20 · Horde

    The Guns of Northwatch

    Bring a group
    Risk
    Dense campRespawn
    Map position
    Near Northwatch Hold · marker 9 at approximately 67% from the left and 60% from the top
    Failure state
    Respawns close the cleared return lane.
    Exit call
    Leave through that lane before it closes.
    Back to map
  10. Checkpoint 10

    20 · Horde

    Free From the Hold

    Skip
    Risk
    EscortTravel
    Map position
    Near Northwatch Hold · marker 10 at approximately 57% from the left and 52% from the top
    Failure state
    The escort controls the pace across the hostile entry route.
    Exit call
    Do not start it. Leave Northwatch by the entry route.
    Back to map
Before this route

Prepare the failure states

Read the lessons that match this map's terrain, group pressure, travel, and reset risks.

Levels 10-25

Use the Crossroads as the anchor. Finish one pocket, return to the road, and reset before the next camp turns the route into a long recovery run.

Take the clean summon

Echeyakee is a short solo stop after you clear the kodo-bone pocket. Use the horn, finish the kill, and leave toward the Crossroads when another mob enters the pocket.

Stop before a chain changes shape

Batch the Ratchet coast

Southsea Freebooters, Stolen Booty, and WANTED: Baron Longshore share the Southsea camp. Work from the Ratchet side, keep the cleared edge behind you, and leave before the inner camp respawns.

Make Northwatch a group decision

The Guns of Northwatch belongs to a prepared group with a cleared retreat. Skip Free From the Hold when the hold is active or the path back to Ratchet has started to refill. The escort is optional. The exit is not.

Where next

Use Stonetalon Mountains as a separate level 18-25 trip. Read each faction label before leaving the Barrens and return to the road between the southern escort, ravine, spider, and Windshear branches.
Related articles
Last updated