Zones

Silverpine Forest

Use the Sepulcher as the reset point, finish the early north as short returns, and treat Ambermill, Pyrewood, and Fenris Isle as deliberate later trips.

Buff My Pet Editorial
Classic Hardcore · safety route

Quest safety dossier

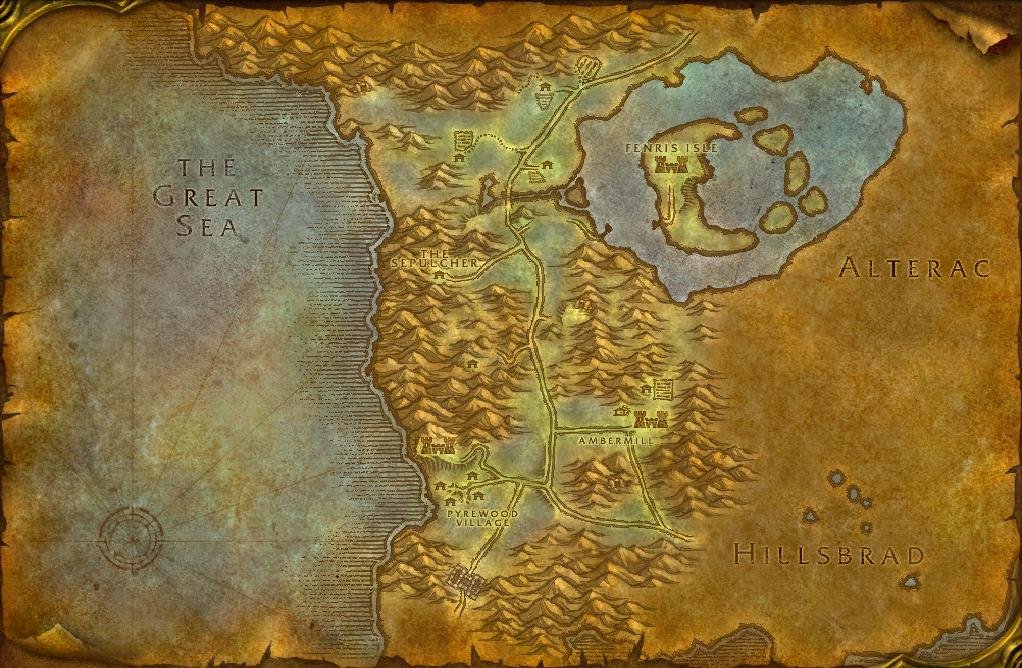
The annotated Classic map shows approximate quest-risk locations, broad hazard areas, and safe anchors. Callouts show our conservative verdict, safety level, and first risk. The lists carry the full failure state and exit call.

Swipe or scroll sideways to inspect the full map.

Map guidance

The Classic zone map is decorative. Numbered markers match the checkpoint cards below. Hazard highlights show approximate risk corridors or areas, never exact spawn points or patrol paths; the visible zone-wide hazard list following the figure carries the equivalent warning details.

Map anchors
  • The Sepulcher (safe hub)
  • Ivar Patch (camp)
  • North Tide's Hollow (cave)
  • Dead Fields (danger area)
  • Fenris Isle landing (coast)
  • Deep Elem Mine (cave)
  • Olsen's Farthing (camp)
  • Ambermill Fork (road gate)
  • Pyrewood Village (danger area)
  • Greymane Wall (danger area)

Annotated Classic zone map. Quest callouts give a short checkpoint label, verdict, safety level, and first listed risk; +N means the card lists more risks. Hazard highlights mark approximate risk corridors or areas, not exact spawn points or patrol paths. Connection relationships are not drawn as navigation lines. Set the Sepulcher as the reset point. Finish the north and central cards as short returns, then make Ambermill, Pyrewood Village, and Fenris Isle deliberate later trips. Checkpoint markers and warning samples are approximate risk areas, not exact spawns or patrol paths. Confirm exact navigation in game. Numbered markers match the ordered checklist below.

  • Do now
  • Return later
  • Bring a group
  • Skip
Persistent threats

Zone-wide hazards

Map highlights are approximate risk areas or corridors. Use these static warnings for the complete call and confirm the threat in game.

  • Warning

    24–25 elite · Both

    Sons of Arugal

    Map label: Sons warning

    Risk
    ElitePatrolTravel
    Area
    Northern and central Silverpine travel lanes
    Failure state
    A level-24 or 25 elite reaches a routine low-teen pull before you have a clean reset lane.
    Exit call
    Do not take the fight. Break toward already-cleared ground and wait out the area before continuing.
    Back to map
  • Warning

    13–15 elite · Both

    Pyrewood after dark

    Map label: Pyrewood after dark

    Risk
    EliteEventTravel
    Area
    Pyrewood Village at night
    Failure state
    The village changes while your route still depends on a clear exit through its streets.
    Exit call
    Leave the village before night changes the area. Daytime villagers are still hostile to Horde players.
    Back to map
  1. Checkpoint 1

    12+ · Horde

    Escorting Erland

    Return later
    Risk
    EscortTravel
    Map position
    Near Ivar Patch · marker 1 at approximately 57% from the left and 13% from the top
    Failure state
    The escort leaves the cleared lane while an extra turns the run into an uncontrolled pull.
    Exit call
    Stop the escort attempt and reset through the ground you already cleared.
    Back to map
  2. Checkpoint 2

    13+ · Horde

    Ivar the Foul

    Return later
    Risk
    Dense campRespawn
    Map position
    Near Ivar Patch · marker 2 at approximately 52% from the left and 14% from the top
    Failure state
    The barn doorway no longer gives you a clean single-pull exit.
    Exit call
    Leave the barn and reset on open ground instead of forcing the head turn-in.
    Back to map
  3. Checkpoint 3

    14+ · Horde

    The Dead Fields

    Do now
    Risk
    EventDense camp
    Map position
    Near Dead Fields · marker 3 at approximately 45% from the left and 22% from the top
    Failure state
    Nightlash appears before the field edge behind you is clear.
    Exit call
    Break back through the cleared field edge and return to the Sepulcher before restarting.
    Back to map
  4. Checkpoint 4

    15+ · Horde

    Arugal's Folly

    Return later
    Risk
    CaveRespawn
    Map position
    Near Deep Elem Mine · marker 4 at approximately 61% from the left and 45% from the top
    Failure state
    A respawn appears behind Grimson while the mine exit is no longer clear.
    Exit call
    Leave through the mine mouth with the quest unfinished.
    Back to map
  5. Checkpoint 5

    13+ · Horde

    A Recipe for Death

    Do now
    Risk
    CaveTravel
    Map position
    Near North Tide's Hollow · marker 5 at approximately 36% from the left and 14% from the top
    Failure state
    The final drop pulls the route into the cave after the exterior loop has stopped being clean.
    Exit call
    Keep the exterior loop. Leave the cave drops for a separate prepared return.
    Back to map
  6. Checkpoint 6

    17+ · Horde

    Ambermill Investigations

    Return later
    Risk
    Dense campRespawn
    Map position
    Near Ambermill Fork · marker 6 at approximately 57% from the left and 65% from the top
    Failure state
    A second Ambermill target joins before the route has a clear way back out.
    Exit call
    Break toward the road and reset before taking another interior pull.
    Back to map
  7. Checkpoint 7

    21+ · Horde

    Beren's Peril

    Bring a group
    Risk
    CaveUndeadRespawn
    Map position
    Near Ambermill Fork · marker 7 at approximately 60% from the left and 73% from the top
    Failure state
    The cave stops being one controlled pull at a time and the exit is no longer clear.
    Exit call
    Turn around with the group while the mouth-side lane still belongs to you.
    Back to map
  8. Checkpoint 8

    22+ · Horde

    The Weaver

    Bring a group
    Quest
    The Weaver
    Risk
    Dense campRespawn
    Map position
    Near Ambermill Fork · marker 8 at approximately 65% from the left and 64% from the top
    Failure state
    Ataeric's mages and warders turn the building into more than one controlled pull.
    Exit call
    Leave the building and reset outside rather than extending the fight upstairs.
    Back to map
  9. Checkpoint 9

    15+ · Horde

    Pyrewood Ambush

    Bring a group
    Risk
    EventEliteDense camp
    Map position
    Near Pyrewood Village · marker 9 at approximately 51% from the left and 77% from the top
    Failure state
    The council's next push begins before the group has recovered a clean exit.
    Exit call
    Do not start without a group and a recovery plan; disengage before the next push if it breaks down.
    Back to map
  10. Checkpoint 10

    24+ · Horde

    Assault on Fenris Isle

    Bring a group
    Risk
    EliteDense campTravel
    Map position
    Near Fenris Isle landing · marker 10 at approximately 65% from the left and 25% from the top
    Failure state
    The island approach or keep becomes an uncontrolled elite pull before Thule is isolated.
    Exit call
    Leave the island with the group before the approach refills instead of forcing the head.
    Back to map
Before this route

Prepare the failure states

Read the lessons that match this map's terrain, group pressure, travel, and reset risks.

Levels 10-24

Bind at the Sepulcher and keep the first northern returns short. The southern village, Ambermill, and Fenris Isle each deserve their own preparation and reset plan.

Clear the early north before the south

Escorting Erland and Ivar the Foul share the Ivar Patch area. Treat the escort lane and barn as separate attempts once the route behind you is clear. The Dead Fields can fit the early loop, but Nightlash appears during the Rot Hide work.

A Recipe for Death uses spiders in northwest Skittering Dark and bears found across Silverpine. Keep the exterior loop separate from a cave return.

Make Ambermill a deliberate return

  • Arugal's Folly is the Deep Elem Mine step. Keep the mine mouth behind a clean reset decision.

  • Ambermill Investigations and The Weaver belong to an Ambermill return with a clear road reset. Ataeric is protected by mages and warders.

  • Beren's Peril is a later cave commitment. Bring a group and leave while the mouth-side lane remains clear.

Prepare the village and island finales

Pyrewood Ambush is an elite scripted defense. Assault on Fenris Isle is an elite island finale. Bring a group for either, and keep the timed Pyrewood warning in view before entering the village.
Related articles
Last updated