Zones

Tanaris

Use open terrain for Wastewander and pirate camps. Roots, respawns, and Silithid tunnels remove the exit from a pull.

Buff My Pet Editorial
Classic Hardcore · safety route

Quest safety dossier

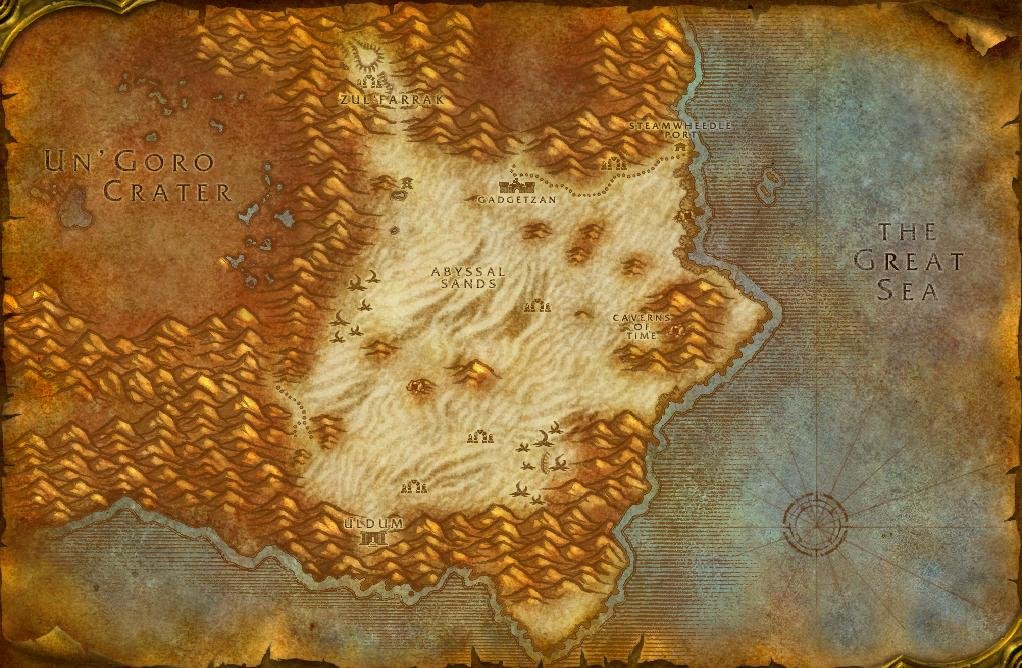
The annotated Classic map shows approximate quest-risk locations, broad hazard areas, and safe anchors. Callouts show our conservative verdict, safety level, and first risk. The lists carry the full failure state and exit call.

Swipe or scroll sideways to inspect the full map.

Map guidance

The Classic zone map is decorative. Numbered markers match the checkpoint cards below. Hazard highlights show approximate risk corridors or areas, never exact spawn points or patrol paths; the visible zone-wide hazard list following the figure carries the equivalent warning details.

Map anchors
  • Gadgetzan (safe hub)
  • Steamwheedle Port (safe hub)
  • Sandsorrow Watch (camp)
  • Waterspring Field (camp)
  • Zul'Farrak gate (danger area)
  • Lost Rigger Cove (coast)
  • Broken Pillar (camp)
  • Noxious Lair (cave)
  • Caverns of Time (cave)
  • Thistleshrub Valley (danger area)
  • Dunemaul Compound (danger area)
  • Southmoon Ruins (danger area)
  • Uldum gate (danger area)

Annotated Classic zone map. Quest callouts give a short checkpoint label, verdict, safety level, and first listed risk; +N means the card lists more risks. Hazard highlights mark approximate risk corridors or areas, not exact spawn points or patrol paths. Connection relationships are not drawn as navigation lines. Gadgetzan is the only reset that matters. Work Waterspring Field and the Sandsorrow pool off the road, keep the eastern Wastewander camps and Lost Rigger Cove as separate prepared trips, and treat the southern ogre ruins as a far branch with no flight path behind it. Confirm exact navigation in game. Numbered markers match the ordered checklist below.

  • Do now
  • Return later
  • Bring a group
  • Skip
Persistent threats

Zone-wide hazards

Map highlights are approximate risk areas or corridors. Use these static warnings for the complete call and confirm the threat in game.

  • Warning

    43-47 · Both

    Wastewander ambush

    Map label: Wastewander Assassins

    Risk
    AmbushDense campRunners
    Area
    The eastern Wastewander camps between Waterspring Field and the Steamwheedle Port road, plus the open sand travellers cut across between them.
    Failure state
    An Assassin unstealths behind you while a Shadow Mage holds you at range and the Rogue you opened on is still above half health.
    Exit call
    Pull Wastewanders out to open sand before committing. Reset toward the Gadgetzan road the moment an unannounced third target lands on you.
    Back to map
  • Warning

    41-46 · Both

    Hyenas and scorpids

    Map label: Blisterpaw hyenas

    Risk
    PatrolAmbush
    Area
    The Abyssal Sands crossings between Gadgetzan, Broken Pillar, and the western dunes, where blisterpaw hyenas and scorpids wander without fixed camps.
    Failure state
    A wandering hyena joins a fight you started mid-crossing, and the nearest dune or rock is too far to break line of sight before the pair has you.
    Exit call
    Cross the sands in straight lines between named points. If a second beast joins, walk back down your own path instead of pressing on to the objective.
    Back to map
  • Warning

    46-50 · Both

    Thistleshrub clusters

    Map label: Thistleshrub clusters

    Risk
    Dense campRespawn
    Area
    Thistleshrub Valley in the south-east, where Gnarled Thistleshrubs and Rootshapers stand in overlapping groups across the line people walk to the ogre ruins.
    Failure state
    One Gnarled Thistleshrub brings the Rootshaper standing behind it, and the valley has no road to fall back onto once a third joins.
    Exit call
    Route around the valley when you are heading for Dunemaul or the southern ruins. If two shrubs commit, leave north toward Broken Pillar.
    Back to map
  1. Checkpoint 1

    41+ · Both

    Wastewander Justice at Waterspring Field

    Do now
    Risk
    Dense campRunners
    Map position
    Near Waterspring Field · marker 1 at approximately 55% from the left and 27% from the top
    Failure state
    A Wastewander Thief runs at low health, wakes the next tent group, and the Bandits behind you close in while you are still chasing the water pouch.
    Exit call
    If a target runs, drop it and walk back toward the Gadgetzan road rather than following it into the next tent.
    Back to map
  2. Checkpoint 2

    43+ · Horde

    The Horde testing kit across the sands

    Do now
    Risk
    TravelPatrol
    Map position
    Near Gadgetzan · marker 2 at approximately 47% from the left and 38% from the top
    Failure state
    The power source runs down, so you take a second hyena while the first is still up, out in open sand with nothing to break line of sight on.
    Exit call
    If the kit is about to expire, let it expire. Buy another power source with water pouches instead of chain-pulling the sands to beat the timer.
    Back to map
  3. Checkpoint 3

    42+ · Both

    The dowsing widget at Sandsorrow Watch

    Do now
    Risk
    Dense campPatrol
    Map position
    Near Sandsorrow Watch · marker 3 at approximately 45% from the left and 29% from the top
    Failure state
    You use the widget at the water with the camp above Sandsorrow Watch still occupied, and a wanderer reaches you before the sample finishes.
    Exit call
    Clear or time the camp first, use the widget from the pool edge nearest the Gadgetzan road, and leave the moment it completes.
    Back to map
  4. Checkpoint 4

    45+ · Both

    More Wastewander Justice and Caliph Scorpidsting

    Return later
    Risk
    AmbushDense campRunners
    Map position
    Near Waterspring Field · marker 4 at approximately 62% from the left and 32% from the top
    Failure state
    A stealthed Assassin opens on you while a Shadow Mage casts from the back of the camp and Caliph Scorpidsting's neighbours are still standing.
    Exit call
    If a second Wastewander joins before the Shadow Mage is down, break west toward the Gadgetzan road and re-pull from open sand.
    Back to map
  5. Checkpoint 5

    45+ · Both

    Rescue OOX-17/TN

    Bring a group
    Risk
    EscortAmbushPatrol
    Map position
    Near Waterspring Field · marker 5 at approximately 58% from the left and 14% from the top
    Failure state
    The robot keeps walking toward Steamwheedle Port while ambushers spawn behind it, so the second wave reaches you before the first one is dead.
    Exit call
    If two waves overlap, let the robot die and re-take the beacon later rather than holding a moving line you cannot reset.
    Back to map
  6. Checkpoint 6

    47+ · Both

    The Southsea ships at Lost Rigger Cove

    Bring a group
    Risk
    Dense campRespawnRunnersPatrol
    Map position
    Near Lost Rigger Cove · marker 6 at approximately 72% from the left and 33% from the top
    Failure state
    Andre Firebeard's deck adds link with the next Southsea group, a Freebooter runs at low health, and the dock respawn closes the ramp while you are still counting hats.
    Exit call
    Take one ship per trip from the shoreward ramp. Leave the cove the first time a deck you already cleared refills behind you.
    Back to map
  7. Checkpoint 7

    46+ · Both

    The Noxious Lair and Scrimshank

    Return later
    Risk
    CaveDense campRespawn
    Map position
    Near Noxious Lair · marker 7 at approximately 61% from the left and 51% from the top
    Failure state
    Junior Surveyor Scrimshank sits past the first bend, and the Centipaar you walked through respawn into the only tunnel back out.
    Exit call
    Take the five insect parts off the surface swarm first. If the tunnel behind you refills before you reach Scrimshank, turn around and leave with the parts alone.
    Back to map
  8. Checkpoint 8

    49+ · Both

    The Dunemaul Compound

    Bring a group
    Risk
    Dense campPatrolRespawn
    Map position
    Near Dunemaul Compound · marker 8 at approximately 46% from the left and 60% from the top
    Failure state
    Brutes and Enforcers share sightlines across the compound, so the pull that finally reaches Gor'marok the Ravager arrives with two ogres already attached.
    Exit call
    Pull single ogres out to the sand beyond the compound. If Gor'marok comes with company, break south and leave the kill for a group.
    Back to map
  9. Checkpoint 9

    50+ · Both

    Gahz'ridian in the moon ruins

    Skip
    Quest
    Gahz'ridian
    Risk
    TravelDense campRespawn
    Map position
    Near Southmoon Ruins · marker 9 at approximately 45% from the left and 70% from the top
    Failure state
    Thirty ornaments means repeated loops through Eastmoon and Southmoon Ruins, and every dig holds you stationary in an ogre camp that has already respawned once.
    Exit call
    Do not farm this on the way through. Take ornaments only when the ground around you is already clear, and hand it to Marvon Rivetseeker whenever the count lands.
    Back to map
  10. Checkpoint 10

    48+ · Both

    Tooga's Quest

    Return later
    Risk
    EscortTravelPatrol
    Map position
    Near Thistleshrub Valley · marker 10 at approximately 55% from the left and 61% from the top
    Failure state
    Tooga crosses the eastern desert at his own pace, so anything that aggros mid-route becomes a fight you cannot outrun without losing him and the run.
    Exit call
    Clear ahead of Tooga rather than walking beside him. If you reach the coast with a pack still following, abandon the escort and take the road to Torta alone.
    Back to map
Before this route

Prepare the failure states

Read the lessons that match this map's terrain, group pressure, travel, and reset risks.

Levels 40-50

Arrive around 42, when the first camps are within the character’s level range.

Open ground still has pull risk

  • Wastewander camps: dense camps with casters and melee. The caster roots, then the melee closes the distance.

  • Pirates: south of the zone with fast respawns, multiple casters, and runners at low health.

  • Insects: Silithid hives have tight tunnels and patrols. Treat each hive as a small dungeon route.

Use open ground for pull angles

  • Do Gadgetzan quests first. They are close to the flight path and have the shortest travel time.

  • Save pirate quests for 45+. Their density and respawns raise the pull risk.

  • Pull singles out of camps before closing distance. Use the open terrain to keep an exit lane before a root lands.

A root removes the exit lane

Wastewander roots can remove the exit lane from an otherwise open pull. Pull from clear terrain.

Related articles
Last updated