Zones

Teldrassil

Leave Shadowglen with the spider cave finished or skipped, keep Fel Rock and Ban'ethil separate, and clear Mist's return before accepting the timer.

Buff My Pet Editorial
Classic Hardcore · safety route

Quest safety dossier

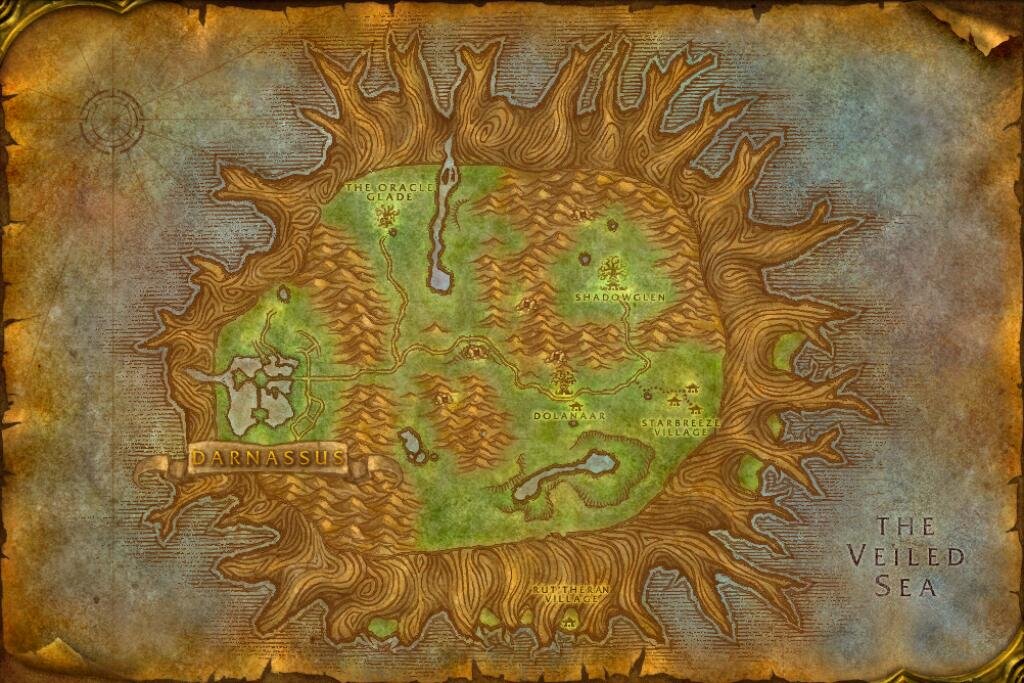
The annotated Classic map shows approximate quest-risk locations and safe anchors. Callouts show our conservative verdict, safety level, and first risk. The checklist carries the full failure state and exit call.

Swipe or scroll sideways to inspect the full map.

Map guidance

The Classic zone map is decorative. Numbered markers match the cards below; every card names its explicitly reviewed map anchor and approximate relative position.

Map anchors
  • Aldrassil (safe hub)
  • Shadowthread Cave (cave)
  • Dolanaar (safe hub)
  • Fel Rock (cave)
  • Lake Al'Ameth (camp)
  • Ban'ethil Barrow Den (cave)
  • Oracle Glade (safe hub)
  • Mist (danger area)
  • Wellspring Lake (danger area)
  • Gnarlpine Hold (danger area)
  • Darnassus (safe hub)
  • Rut'theran Gate (road gate)

Annotated Classic zone map. Quest callouts give a short checkpoint label, verdict, safety level, and first listed risk; +N means the card lists more risks. Marker positions identify approximate quest-risk areas, not exact spawn points. Connection relationships are not drawn as navigation lines. Finish Shadowglen before Dolanaar. Treat Shadowthread Cave, Fel Rock, Lake Al'Ameth, Ban'ethil Barrow Den, the Oracle Glade, Wellspring Lake, and Gnarlpine Hold as separate trips. Checkpoint markers are approximate risk areas, not exact spawns or safe paths. Confirm exact navigation in game. Numbered markers match the ordered checklist below.

  • Do now
  • Return later
  • Bring a group
  • Skip
  1. Checkpoint 1

    6+ · Alliance

    Webwood Egg

    Return later
    Quest
    Webwood Egg
    Risk
    CaveRespawn
    Map position
    Near Shadowthread Cave · marker 1 at approximately 62% from the left and 28% from the top
    Failure state
    A Webwood spider respawns behind you while the egg remains in the deep nest.
    Exit call
    Return with level room, follow the cleared cave back exactly, and leave on the first back-respawn.
    Back to map
  2. Checkpoint 2

    8+ · Alliance

    Twisted Hatred

    Bring a group
    Risk
    CaveRespawn
    Map position
    Near Fel Rock · marker 2 at approximately 60% from the left and 53% from the top
    Failure state
    Lord Melenas survives the opening control while another grell or cave respawn closes the route out.
    Exit call
    Bring a group, clear the named room's return first, and leave when the last bend refills.
    Back to map
  3. Checkpoint 3

    8+ · Alliance

    Timberling Seeds

    Do now
    Risk
    Dense campRunners
    Map position
    Near Lake Al'Ameth · marker 3 at approximately 64% from the left and 71% from the top
    Failure state
    A damaged timberling pulls another lake-side pack while the shoreline reduces the reset angle.
    Exit call
    Work the open lake edge and reset toward Denalan rather than following a target through the trees.
    Back to map
  4. Checkpoint 4

    10+ · Alliance

    Oakenscowl

    Bring a group
    Quest
    Oakenscowl
    Risk
    CaveDense camp
    Map position
    Near Lake Al'Ameth · marker 4 at approximately 64% from the left and 82% from the top
    Failure state
    Oakenscowl holds the fight while another timberling or cave occupant blocks the southern-bank exit.
    Exit call
    Bring a group and clear from the cave mouth inward; abandon the pull before the entrance lane fills.
    Back to map
  5. Checkpoint 5

    10+ · Alliance

    Ban'ethil Barrow Den

    Skip
    Risk
    CaveRespawn
    Map position
    Near Ban'ethil Barrow Den · marker 5 at approximately 39% from the left and 55% from the top
    Failure state
    Multiple relic rooms or a low-drop charm keep you inside while Gnarlpine defenders refill the confusing return.
    Exit call
    Skip the den on a solo 1-10 pass. A later group turns out as soon as the cleared entrance route refills.
    Back to map
  6. Checkpoint 6

    12+ · Alliance

    Mist

    Do now
    Quest
    Mist
    Risk
    EscortEvent
    Map position
    Near Mist · marker 6 at approximately 24% from the left and 39% from the top
    Failure state
    The timer begins before the harpy-and-spider route to the Oracle moonwell is cleared.
    Exit call
    Clear the full return first, then accept Mist and lead her directly to Arynia without adding side fights.
    Back to map
  7. Checkpoint 7

    12+ · Alliance

    Tears of the Moon

    Return later
    Risk
    Dense campTravel
    Map position
    Near Wellspring Lake · marker 7 at approximately 36% from the left and 17% from the top
    Failure state
    Lady Sathrah survives while another spider or the long northern return removes the clean reset.
    Exit call
    Return at 12+, clear the nearby spiders first, and disengage toward the Oracle Glade before an extra joins.
    Back to map
  8. Checkpoint 8

    12+ · Alliance

    Ursal the Mauler

    Bring a group
    Risk
    Dense campRespawn
    Map position
    Near Gnarlpine Hold · marker 8 at approximately 49% from the left and 84% from the top
    Failure state
    Ursal survives the first control window while another Gnarlpine closes the route out of the hold.
    Exit call
    Bring a group, clear the named pocket from the outside in, and leave when the return lane gains an extra.
    Back to map
Before this route

Prepare the failure states

Read the lessons that match this map's terrain, group pressure, travel, and reset risks.

Levels 1-10

Finish Shadowglen before taking the road to Dolanaar. Teldrassil's elevation and dense pockets make short returns safer than one continuous circuit.

Keep every cave separate

Webwood Egg ends deep in Shadowthread Cave. Twisted Hatred belongs to Fel Rock. The Ban'ethil relic and sleeping-druid work is a third, larger cave decision. Repair and reset between them; no shared progress makes the next cave safer.

Clear before accepting Mist

Mist follows you to the Oracle moonwell on a timer and does not start a conventional scripted ambush. Clear the harpy-and-spider return before accepting, then take the direct route without side fights.

Where next

Continue to Darkshore after level 10. Train in Darnassus first, then take the Rut'theran connection only after repairs and bag cleanup.
Related articles
Last updated