Zones

Western Plaguelands

Work the cauldron chain west to east and keep Chillwind Camp or the Bulwark as the reset. Andorhal refills faster than one quest loop takes.

Buff My Pet Editorial
Classic Hardcore · safety route

Quest safety dossier

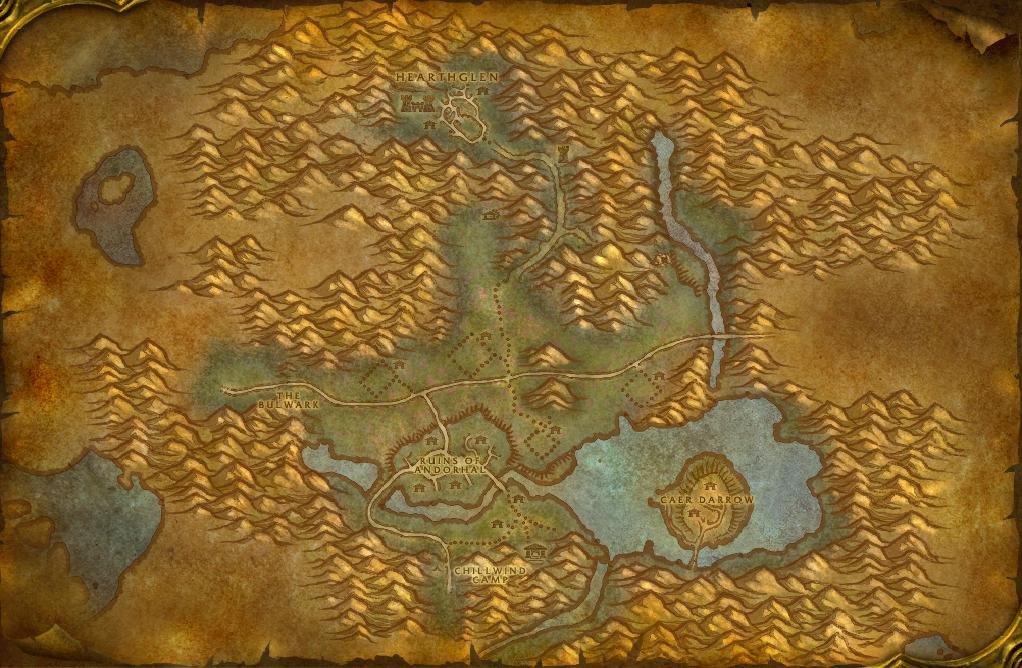
The annotated Classic map shows approximate quest-risk locations, broad hazard areas, and safe anchors. Callouts show our conservative verdict, safety level, and first risk. The lists carry the full failure state and exit call.

Swipe or scroll sideways to inspect the full map.

Map guidance

The Classic zone map is decorative. Numbered markers match the checkpoint cards below. Hazard highlights show approximate risk corridors or areas, never exact spawn points or patrol paths; the visible zone-wide hazard list following the figure carries the equivalent warning details.

Map anchors
  • The Bulwark (safe hub)
  • Chillwind Camp (safe hub)
  • Hearthglen road (road gate)
  • Felstone Field (camp)
  • Dalson's Tears (camp)
  • Writhing Haunt (camp)
  • Gahrron's Withering (camp)
  • Ruins of Andorhal (danger area)
  • Sorrow Hill (danger area)
  • Uther's Tomb (camp)
  • Caer Darrow (coast)
  • Northridge Mill (danger area)
  • Hearthglen (danger area)

Annotated Classic zone map. Quest callouts give a short checkpoint label, verdict, safety level, and first listed risk; +N means the card lists more risks. Hazard highlights mark approximate risk corridors or areas, not exact spawn points or patrol paths. Connection relationships are not drawn as navigation lines. Work the cauldron chain west to east from Felstone Field and keep Chillwind Camp or the Bulwark as the reset. Andorhal, Northridge Lumber Mill, and Hearthglen are separate prepared trips, not stops on the loop. Confirm exact navigation in game. Numbered markers match the ordered checklist below.

  • Do now
  • Return later
  • Bring a group
  • Skip
Persistent threats

Zone-wide hazards

Map highlights are approximate risk areas or corridors. Use these static warnings for the complete call and confirm the threat in game.

  • Warning

    51-56 · Both

    Plaguehound packs

    Map label: Plaguehound packs

    Risk
    AmbushPatrolTravel
    Area
    Open plain between the Bulwark road, Felstone Field, and Dalson's Tears, where hound packs cross the same grass that Plaguebats fly over
    Failure state
    A Plaguebat drops onto a hound pull in open field, the disease stack keeps ticking through both fights, and there is nothing but grass between you and the road.
    Exit call
    Cross the plain on the road rather than through the fields. If a bat joins a hound pull, back to the nearest fence line and finish one target at a time.
    Back to map
  • Warning

    56-60 · Both

    Scarlet road patrols

    Map label: Scarlet road patrols

    Risk
    PatrolEliteTravel
    Area
    The switchback road running north from Northridge Lumber Mill to the Hearthglen gate, where Scarlet Crusade patrols hold both shoulders
    Failure state
    A Scarlet patrol takes the road behind you while you are already committed on the shoulder, and the only open ground left runs uphill into Hearthglen.
    Exit call
    Ride the road, do not fight on it. If a patrol closes, break downhill south toward Northridge Lumber Mill instead of north.
    Back to map
  • Warning

    55-60 · Both

    Andorhal respawn

    Map label: Andorhal respawn

    Risk
    RespawnUndeadDense campAmbush
    Area
    The ruined streets, silos, and tower bases of Andorhal, where cleared ground refills faster than one quest loop takes
    Failure state
    A lockbox loop runs long enough that the street you cleared has refilled, and the walk back out meets fresh ghouls with your health already spent on the way in.
    Exit call
    Bank one objective per trip and leave by the southern road. If two mobs path in from ground you already cleared, run for Chillwind Camp or hearth.
    Back to map
  1. Checkpoint 1

    52-54 · Both

    Felstone Field cauldron

    Do now
    Risk
    UndeadDense campPatrol
    Map position
    Near Felstone Field · marker 1 at approximately 34% from the left and 56% from the top
    Failure state
    The Cauldron Lord is pulled with Scourge still standing on the barn side, and the fight drifts north into the hound pack that crosses the fence line.
    Exit call
    Pull the Cauldron Lord out to the western fence and fight him there. If a second Scourge mob commits, drop the bottle attempt and take the open ground back to the road.
    Back to map
  2. Checkpoint 2

    53+ · Horde

    Scarlet Diversions

    Do now
    Risk
    Dense campEventPatrol
    Map position
    Near Felstone Field · marker 2 at approximately 42% from the left and 47% from the top
    Failure state
    The command tent goes up with Scarlet casters still alive, and planting the Scourge banner holds you in place while the camp's melee closes from two sides.
    Exit call
    Kill the casters before you touch the tent. If a second Scarlet group commits after the banner drops, run west for the Bulwark road and let the camp reset.
    Back to map
  3. Checkpoint 3

    54-56 · Both

    Dalson's Tears cauldron

    Do now
    Risk
    UndeadDense campAmbush
    Map position
    Near Dalson's Tears · marker 3 at approximately 52% from the left and 54% from the top
    Failure state
    Dalson's Tears keeps ghouls inside the fence and Plaguebats above it, so a Cauldron Lord taken in the yard picks up an air add you never saw path in.
    Exit call
    Fight the Cauldron Lord on the open side of the fence. On the first bat or ghoul add, break south to the east-west road and reset before you retake the key.
    Back to map
  4. Checkpoint 4

    55-56 · Both

    Writhing Haunt cauldron and the wolf cull

    Do now
    Risk
    UndeadDense campRespawn
    Map position
    Near Writhing Haunt · marker 4 at approximately 59% from the left and 65% from the top
    Failure state
    Diseased Wolves are counted inside the Writhing Haunt fence, one pull links a second wolf, and the Cauldron Lord's escort arrives before either is down.
    Exit call
    Take the eight wolves on the outer field first and the cauldron last. If the Cauldron Lord shows up with his escort intact, leave by the south fence toward the Andorhal road.
    Back to map
  5. Checkpoint 5

    57-58 · Both

    Gahrron's Withering cauldron

    Return later
    Risk
    TravelUndeadPatrol
    Map position
    Near Gahrron's Withering · marker 5 at approximately 68% from the left and 57% from the top
    Failure state
    The long ride east along the ridge road lands you in Gahrron's Withering at half health, and the Cauldron Lord's yard adds arrive before a drink finishes.
    Exit call
    Come east full and rested, and only after the other three cauldrons are open. If the Cauldron Lord brings company, run west along the road, never north into the ridge.
    Back to map
  6. Checkpoint 6

    52-54 · Alliance

    Clear the Way at Sorrow Hill

    Do now
    Risk
    UndeadRespawnDense camp
    Map position
    Near Sorrow Hill · marker 6 at approximately 42% from the left and 80% from the top
    Failure state
    Skeletal Flayers and Slavering Ghouls are counted from inside the graves, the plot behind you refills while you are still on the twentieth kill, and a third mob walks in.
    Exit call
    Work the outer graves and count toward Chillwind Camp, not away from it. On a third mob, walk out to the camp road and let the hill repopulate.
    Back to map
  7. Checkpoint 7

    56-58 · Both

    Chromie in the Andorhal Inn

    Do now
    Risk
    UndeadRespawnAmbush
    Map position
    Near Ruins of Andorhal · marker 7 at approximately 40% from the left and 73% from the top
    Failure state
    The Temporal Displacer goes down beside a silo with Scourge still pathing the rubble, and ten Temporal Parasites spawn at once into a fight you did not pick.
    Exit call
    Clear the silo apron before you plant the Displacer. If the parasite burst overlaps an Andorhal patrol, run for the Andorhal Inn and let the whole pull reset.
    Back to map
  8. Checkpoint 8

    60+ · Both

    Araj the Summoner

    Skip
    Risk
    EliteDense campUndeadRespawn
    Map position
    Near Ruins of Andorhal · marker 8 at approximately 48% from the left and 62% from the top
    Failure state
    Araj keeps summoning while the ruins refill around his tower, and by the time the phylactery shard drops the lane you walked in by is already occupied.
    Exit call
    Do not open on Araj on this route. Come back with a full group that owns the tower approach and can hold one cleared exit.
    Back to map
  9. Checkpoint 9

    56-58 · Both

    Northridge Lumber Mill termites

    Bring a group
    Risk
    Dense campPatrolTravel
    Map position
    Near Northridge Mill · marker 9 at approximately 44% from the left and 32% from the top
    Failure state
    The barrel has to be released in the middle of the mill, so the release happens inside the Scarlet camp with troopers on both approach lanes and no cleared ground behind you.
    Exit call
    Bring a partner to hold the road side while the barrel goes down. Once the termites are out, leave downhill to the south rather than back through the camp.
    Back to map
  10. Checkpoint 10

    58-60 · Both

    Scarlet Subterfuge and In Dreams

    Skip
    Risk
    EscortEliteDense campTravel
    Map position
    Near Hearthglen · marker 10 at approximately 38% from the left and 15% from the top
    Failure state
    The Scarlet Illusion carries you into Mardenholde Keep safely, then the escort starts, the disguise is gone, and Taelan's run out of Hearthglen leaves you fighting Scarlet elites in the open.
    Exit call
    Take Tirion's Gift to Taelan under the illusion and stop there. Do not start the escort solo on this route, and log the quest for a group trip instead.
    Back to map
Before this route

Prepare the failure states

Read the lessons that match this map's terrain, group pressure, travel, and reset risks.

Levels 51-58

The cauldron chain gives Western Plaguelands a natural west-to-east order. Keep Chillwind Camp or the Bulwark as the reset, and treat Andorhal, Northridge Lumber Mill, and Hearthglen as separate prepared trips rather than stops on the same loop.

What kills characters here

  • Plaguehound and Plaguebat packs: hounds cross the same open plain the bats fly over, so one pull becomes two layers.

  • Scarlet patrols: the Hearthglen road holds patrols on both shoulders, and several are elite.

  • Andorhal respawn: cleared streets and silo bases refill faster than a single quest loop takes.

Plan the trips

  • Run the cauldrons in order from Felstone Field east. Each one shortens the next return.

  • Treat Hearthglen as its own trip. The switchback road is the fight, not the destination.

  • Leave Andorhal before the second pass. The ground you cleared is already back.

The reset is the plan

A cleared street in Andorhal is a timer, not a result. Leave on the timer.

Related articles
Last updated