Zones

Ashenvale

Keep the Alliance and Horde trips separate, use Astranaar or Splintertree Post as the reset, and bring a group for the Horde escort and banner events.

Buff My Pet Editorial
Classic Hardcore · safety route

Quest safety dossier

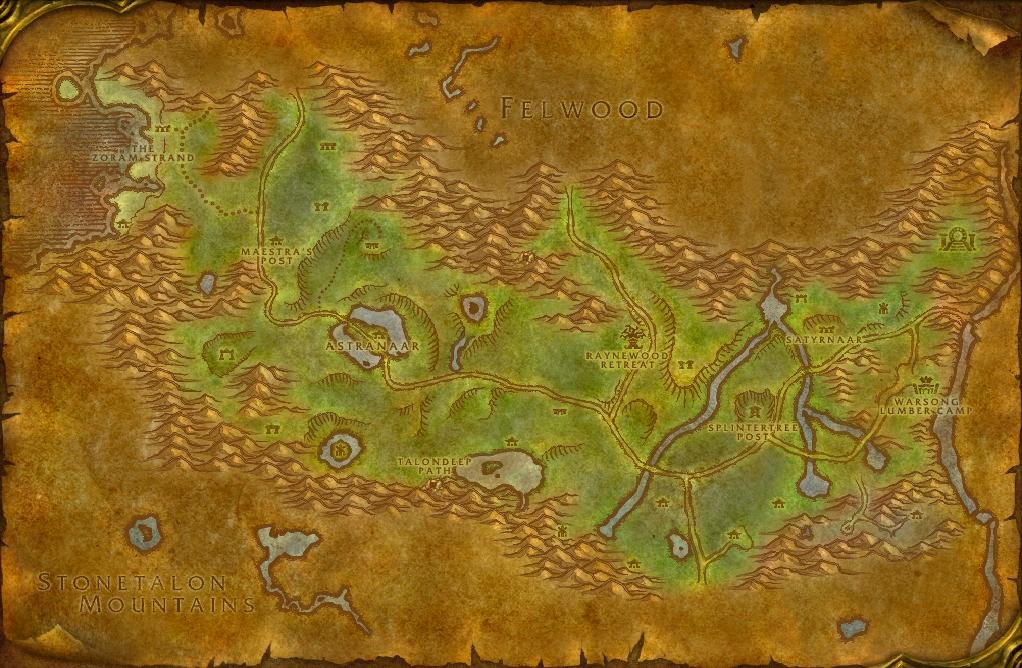
The annotated Classic map shows approximate quest-risk locations, broad hazard areas, and safe anchors. Callouts show our conservative verdict, safety level, and first risk. The lists carry the full failure state and exit call.

Swipe or scroll sideways to inspect the full map.

Map guidance

The Classic zone map is decorative. Numbered markers match the checkpoint cards below. Hazard highlights show approximate risk corridors or areas, never exact spawn points or patrol paths; the visible zone-wide hazard list following the figure carries the equivalent warning details.

Map anchors
  • Zoram'gar Outpost (safe hub)
  • Lake Falathim (danger area)
  • Astranaar (safe hub)
  • Howling Vale (cave)
  • Xavian (danger area)
  • Splintertree Post (safe hub)
  • Mystral Lake (coast)
  • Thistlefur Hold (cave)
  • Foulweald Mound (danger area)

Annotated Classic zone map. Quest callouts give a short checkpoint label, verdict, safety level, and first listed risk; +N means the card lists more risks. Hazard highlights mark approximate risk corridors or areas, not exact spawn points or patrol paths. Connection relationships are not drawn as navigation lines. Follow only your faction's five-card track. Use Astranaar or Splintertree Post as the reset between branches. Checkpoint markers and the warning sample are approximate risk areas, not exact spawns or patrol paths. Confirm exact navigation in game. Numbered markers match the ordered checklist below.

  • Do now
  • Return later
  • Bring a group
  • Skip
Persistent threats

Zone-wide hazards

Map highlights are approximate risk areas or corridors. Use these static warnings for the complete call and confirm the threat in game.

  • Warning

    35 elite · Horde

    Wandering Protector

    Map label: Protector warning

    Risk
    ElitePatrolTravel
    Area
    East of Raynewood Retreat around the Night Run roads
    Failure state
    The level-35 elite reaches a routine Horde pull before the road behind you is clear.
    Exit call
    Do not fight it at quest level. Hold on cleared ground and wait for the patrol area to open.
    Back to map
Faction route

Alliance quest route

Alliance · Markers 1–5

  1. Checkpoint 1

    20+ · Alliance

    The Ancient Statuette

    Do now
    Risk
    TravelDense camp
    Map position
    Near Zoram'gar Outpost · marker 1 at approximately 14% from the left and 21% from the top
    Failure state
    The shoreline pickup draws the route into a second naga pocket before the beach behind you is clear.
    Exit call
    Reset along the cleared strand and leave the statuette for the next pass.
    Back to map
  2. Checkpoint 2

    25+ · Alliance

    Ruuzel

    Return later
    Quest
    Ruuzel
    Risk
    Dense campPatrolTravel
    Map position
    Near Zoram'gar Outpost · marker 2 at approximately 9% from the left and 15% from the top
    Failure state
    Ruuzel or another ring source stays linked to guards while the island exit is occupied.
    Exit call
    Leave through the cleared shore and wait for an isolated ring source instead of forcing the island.
    Back to map
  3. Checkpoint 3

    21+ · Alliance

    Raene's Cleansing

    Do now
    Risk
    TravelDense camp
    Map position
    Near Lake Falathim · marker 3 at approximately 20% from the left and 42% from the top
    Failure state
    The lake stage spreads into another shoreline pack before the route back to Astranaar is clear.
    Exit call
    Finish the current pull, return to Astranaar, and restart the collection on a clean shore.
    Back to map
  4. Checkpoint 4

    30+ · Alliance

    The Howling Vale

    Return later
    Risk
    CaveTravel
    Map position
    Near Howling Vale · marker 4 at approximately 50% from the left and 39% from the top
    Failure state
    The cave approach stops being clear while the tome interaction still holds you inside.
    Exit call
    Leave through the cave mouth with the quest unfinished and return after the approach clears.
    Back to map
  5. Checkpoint 5

    32+ · Alliance

    The Branch of Cenarius

    Return later
    Risk
    Dense campRespawn
    Map position
    Near Xavian · marker 5 at approximately 78% from the left and 42% from the top
    Failure state
    A fast Satyr respawn joins before Geltharis has a clean pull and exit.
    Exit call
    Break back through the cleared arch and reset outside the camp.
    Back to map
Faction route

Horde quest route

Horde · Markers 6–10

  1. Checkpoint 6

    24+ · Horde

    Ashenvale Outrunners

    Do now
    Risk
    AmbushPatrolTravel
    Map position
    Near Splintertree Post · marker 6 at approximately 72% from the left and 72% from the top
    Failure state
    A stealthed Outrunner opens while another forest mob already owns the reset lane.
    Exit call
    Stop sweeping the trees and return to the road outside Splintertree Post.
    Back to map
  2. Checkpoint 7

    25+ · Horde

    Stonetalon Standstill

    Do now
    Risk
    Travel
    Map position
    Near Mystral Lake · marker 7 at approximately 48% from the left and 70% from the top
    Failure state
    The lake objective pulls you away from the shore while another elemental controls the return.
    Exit call
    Move back to the cleared shore and reset before another swim to the gazebo.
    Back to map
  3. Checkpoint 8

    23+ · Horde

    Vorsha the Lasher

    Bring a group
    Risk
    EscortEventDense camp
    Map position
    Near Zoram'gar Outpost · marker 8 at approximately 10% from the left and 28% from the top
    Failure state
    A naga wave survives into the next attack while Muglash keeps the event moving.
    Exit call
    Let the defense fail and retreat through the cleared island edge with the group.
    Back to map
  4. Checkpoint 9

    24+ · Horde

    Freedom to Ruul

    Bring a group
    Risk
    EscortCaveRespawn
    Map position
    Near Thistlefur Hold · marker 9 at approximately 40% from the left and 34% from the top
    Failure state
    A scripted ambush lands while the Thistlefur route behind Ruul has already respawned.
    Exit call
    Let the escort fail and leave through the last cleared cave segment with the group.
    Back to map
  5. Checkpoint 10

    26+ · Horde

    King of the Foulweald

    Bring a group
    Risk
    EventDense campRespawn
    Map position
    Near Foulweald Mound · marker 10 at approximately 56% from the left and 64% from the top
    Failure state
    Banner attackers remain alive when the next pressure reaches the mound.
    Exit call
    Leave the banner and reset through the cleared camp edge with the group.
    Back to map
Before this route

Prepare the failure states

Read the lessons that match this map's terrain, group pressure, travel, and reset risks.

Levels 19-32

Ashenvale stretches every trip across dense terrain. Pick the Alliance or Horde track below, return to your own hub between branches, and leave the opposite faction's route alone.

Alliance shoreline and eastern returns

The Ancient Statuette starts the Zoram Strand pass. Treat Ruuzel as a separate return after the shoreline is clear. Raene's Cleansing and its Glowing Gem stage belong to one Lake Falathim trip with Astranaar as the reset.

The Howling Vale and The Branch of Cenarius are late-zone returns. Leave the cave or Satyr pocket when the path behind you stops being clear.

Horde road, lake, and group events

Ashenvale Outrunners rewards a slow sweep south of Splintertree Post. Stonetalon Standstill is the Mystral Lake branch. Start each from a clean road or shore edge.

  • Vorsha the Lasher is a group escort and defense. Set the retreat before Muglash moves.

  • Freedom to Ruul starts inside Thistlefur Hold. Bring a group and let the escort fail when the exit refills.

  • King of the Foulweald asks you to gather allies. Clear the mound before the banner starts the defense.
Last updated