Zones

Westfall

Use Sentinel Hill as the reset point, clear each farm or Defias pocket as its own trip, and leave the coast and Moonbrook until the pull has a clean exit.

Buff My Pet Editorial
Classic Hardcore · safety route

Quest safety dossier

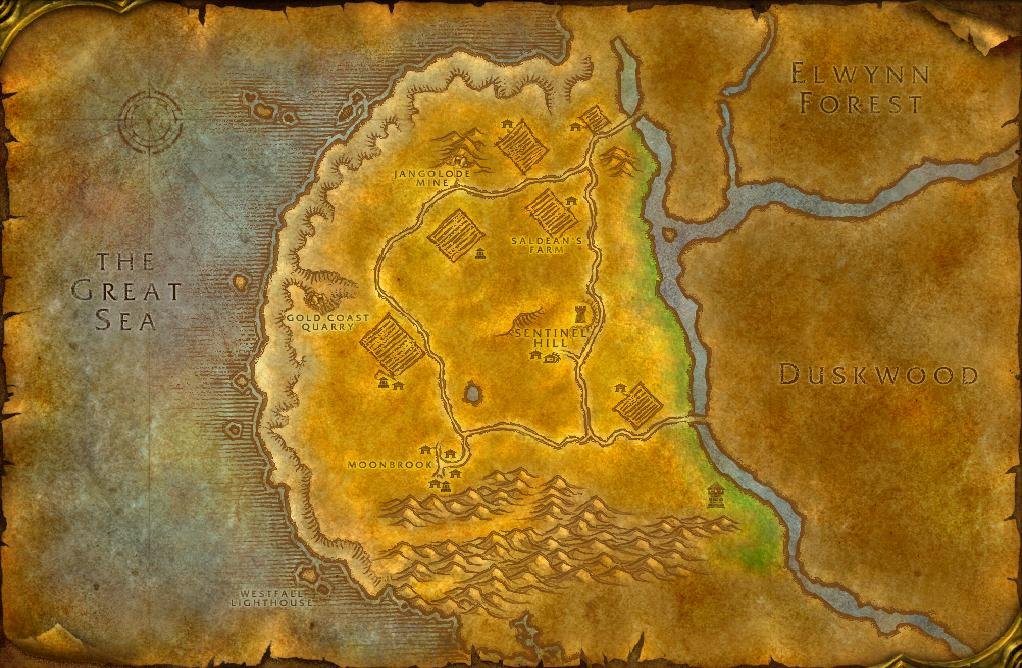
The annotated Classic map shows approximate quest-risk locations, broad hazard areas, and safe anchors. Callouts show our conservative verdict, safety level, and first risk. The lists carry the full failure state and exit call.

Swipe or scroll sideways to inspect the full map.

Map guidance

The Classic zone map is decorative. Numbered markers match the checkpoint cards below. Hazard highlights show approximate risk corridors or areas, never exact spawn points or patrol paths; the visible zone-wide hazard list following the figure carries the equivalent warning details.

Map anchors
  • Sentinel Hill (safe hub)
  • Furlbrow's Farm (camp)
  • Jangolode Mine (cave)
  • Saldean's Farm (camp)
  • Molsen Farm (camp)
  • Gold Coast Quarry (danger area)
  • Alexston Farmstead (danger area)
  • Longshore (coast)
  • Moonbrook (danger area)
  • Dagger Hills (danger area)
  • Westfall Lighthouse (coast)

Annotated Classic zone map. Quest callouts give a short checkpoint label, verdict, safety level, and first listed risk; +N means the card lists more risks. Hazard highlights mark approximate risk corridors or areas, not exact spawn points or patrol paths. Connection relationships are not drawn as navigation lines. Set Sentinel Hill as the reset point. Treat the farms, quarry, Moonbrook, and coast as separate out-and-back trips. Checkpoint markers and warning samples are approximate risk areas, not exact spawns or patrol paths. Confirm exact navigation in game. Numbered markers match the ordered checklist below.

  • Do now
  • Return later
  • Bring a group
  • Skip
Persistent threats

Zone-wide hazards

Map highlights are approximate risk areas or corridors. Use these static warnings for the complete call and confirm the threat in game.

  • Warning

    14–15 · Both

    Defias Pillagers

    Map label: Pillager pockets

    Risk
    Dense campRunnersRespawn
    Area
    Gold Coast Quarry, Alexston Farmstead, and Moonbrook
    Failure state
    A second Pillager or Looter joins while Fireball pressure is already active.
    Exit call
    Break line of sight through already-cleared ground and fully reset instead of trying to win the camp.
    Back to map
  • Warning

    18–19 · Both

    Dust Devils

    Map label: Dust Devil fields

    Risk
    PatrolTravel
    Area
    Open fields across Westfall
    Failure state
    A higher-level Dust Devil reaches the pull while open ground is your only retreat lane.
    Exit call
    Hold the current pull, move into cleared ground, and let the Devil pass before continuing.
    Back to map
  1. Checkpoint 1

    14+ · Alliance

    The People's Militia I

    Do now
    Risk
    Dense campRunners
    Map position
    Near Jangolode Mine · marker 1 at approximately 39% from the left and 29% from the top
    Failure state
    A net lands while a runner reaches another Defias pack.
    Exit call
    Reset through open ground toward Sentinel Hill instead of following the runner into the camp.
    Back to map
  2. Checkpoint 2

    15+ · Alliance

    The Forgotten Heirloom

    Return later
    Risk
    Dense campRunners
    Map position
    Near Furlbrow's Farm · marker 2 at approximately 56% from the left and 14% from the top
    Failure state
    Benny and another Defias control the farmhouse doorway.
    Exit call
    Leave the house untouched and reset across the cleared field edge.
    Back to map
  3. Checkpoint 3

    15+ · Alliance

    Patrolling Westfall

    Do now
    Risk
    RunnersTravel
    Map position
    Near Jangolode Mine · marker 3 at approximately 44% from the left and 14% from the top
    Failure state
    A runner or extra enters from the higher-level southern camps.
    Exit call
    Work the lower Riverpaw edge and break toward the Sentinel Hill road on the first uncontrolled add.
    Back to map
  4. Checkpoint 4

    15+ · Alliance

    The Killing Fields

    Do now
    Risk
    Dense campRespawn
    Map position
    Near Saldean's Farm · marker 4 at approximately 60% from the left and 35% from the top
    Failure state
    A respawn or second Harvest Watcher commits before the first pull is stable.
    Exit call
    Retreat through the cleared field edge toward Saldean's Farm.
    Back to map
  5. Checkpoint 5

    16+ · Both

    Keeper of the Flame

    Do now
    Risk
    Travel
    Map position
    Near Westfall Lighthouse · marker 5 at approximately 39% from the left and 83% from the top
    Failure state
    The lighthouse trip becomes a second exposed run because you left without all five oils.
    Exit call
    Do not leave the farm loop for the coast until all five oils are in the bag.
    Back to map
  6. Checkpoint 6

    17+ · Alliance

    The People's Militia II

    Return later
    Risk
    Dense campRunnersRespawn
    Map position
    Near Alexston Farmstead · marker 6 at approximately 39% from the left and 60% from the top
    Failure state
    A second Pillager or Looter joins while Fireball pressure is active.
    Exit call
    Break line of sight through cleared terrain and fully reset.
    Back to map
  7. Checkpoint 7

    18+ · Alliance

    The People's Militia III

    Return later
    Risk
    Dense campRunnersRespawn
    Map position
    Near Dagger Hills · marker 7 at approximately 54% from the left and 73% from the top
    Failure state
    A runner reaches another camp or recovery is interrupted on the Dagger Hills approach.
    Exit call
    Do not chase uphill. Leave through the last cleared approach.
    Back to map
  8. Checkpoint 8

    18+ · Alliance

    The Defias Brotherhood escort

    Bring a group
    Risk
    EscortDense campRunners
    Map position
    Near Moonbrook · marker 8 at approximately 49% from the left and 65% from the top
    Failure state
    The Traitor advances into multiple Defias or the cleared lane respawns.
    Exit call
    Let the escort fail and retreat along the last cleared lane.
    Back to map
  9. Checkpoint 9

    19+ · Both

    The Coast Isn't Clear

    Skip
    Risk
    Dense campRunnersTravel
    Map position
    Near Longshore · marker 9 at approximately 20% from the left and 63% from the top
    Failure state
    A Murloc Netter roots you or a required target flees into another shoreline pack.
    Exit call
    Leave the quest unfinished and return inland.
    Back to map
  10. Checkpoint 10

    20+ · Both

    The Coastal Menace

    Return later
    Risk
    Dense campTravel
    Map position
    Near Westfall Lighthouse · marker 10 at approximately 25% from the left and 79% from the top
    Failure state
    Old Murk-Eye reaches another murloc pocket before the pull is isolated.
    Exit call
    Do not tag. Wait from open ground or abandon the card.
    Back to map
Before this route

Prepare the failure states

Read the lessons that match this map's terrain, group pressure, travel, and reset risks.

Levels 10-20

Westfall looks open until a runner crosses a farm or a caster pulls from a nearby pocket. Set your hearth at Sentinel Hill, finish one branch at a time, and reset before the next camp makes the road home expensive.

Keep the early farms separate

The People's Militia and The Killing Fields fit a clean farm loop. Stop when a net, extra Watcher, or runner takes away the field edge you planned to use for the reset.

Return for the Defias pressure

  • The People's Militia sends you into Pillager pockets. Return with enough level room to break line of sight and reset after the first uncontrolled extra.

  • The People's Militia belongs to the Dagger Hills return, after the road behind you is clear.

  • The Defias Brotherhood is an escort. Bring a group and let the run fail if the route fills before the Traitor moves on.

Make the coast one prepared trip

Keeper of the Flame is a simple turn-in when the oils are already in your bag. The Coast Isn't Clear and The Coastal Menace ask for a longer shoreline commitment. Keep the lighthouse route separate from the Defias work.

Where next

Continue to Redridge Mountains near level 19-20 for the lake and outer-camp layer. Rotate to Loch Modan instead when Redridge's named targets or group cards are still above your level.
Related articles
Last updated